Overview & Layout
Scripture Toolkit is a three-panel Bible study application built by BibleSoft Canada. Every feature is designed to keep you in the Word without switching between apps or losing your place. Everything is free to read without an account — the Bible texts, commentaries, the Theology Library, and the ISBE encyclopedia. Create a free account and your work is saved and cloud-synced — sign in with Google or email on any device and pick up exactly where you left off. Share your studies, join groups, and grow together through the Community Portal. (See Free to Read, Account to Save for exactly what needs an account.)
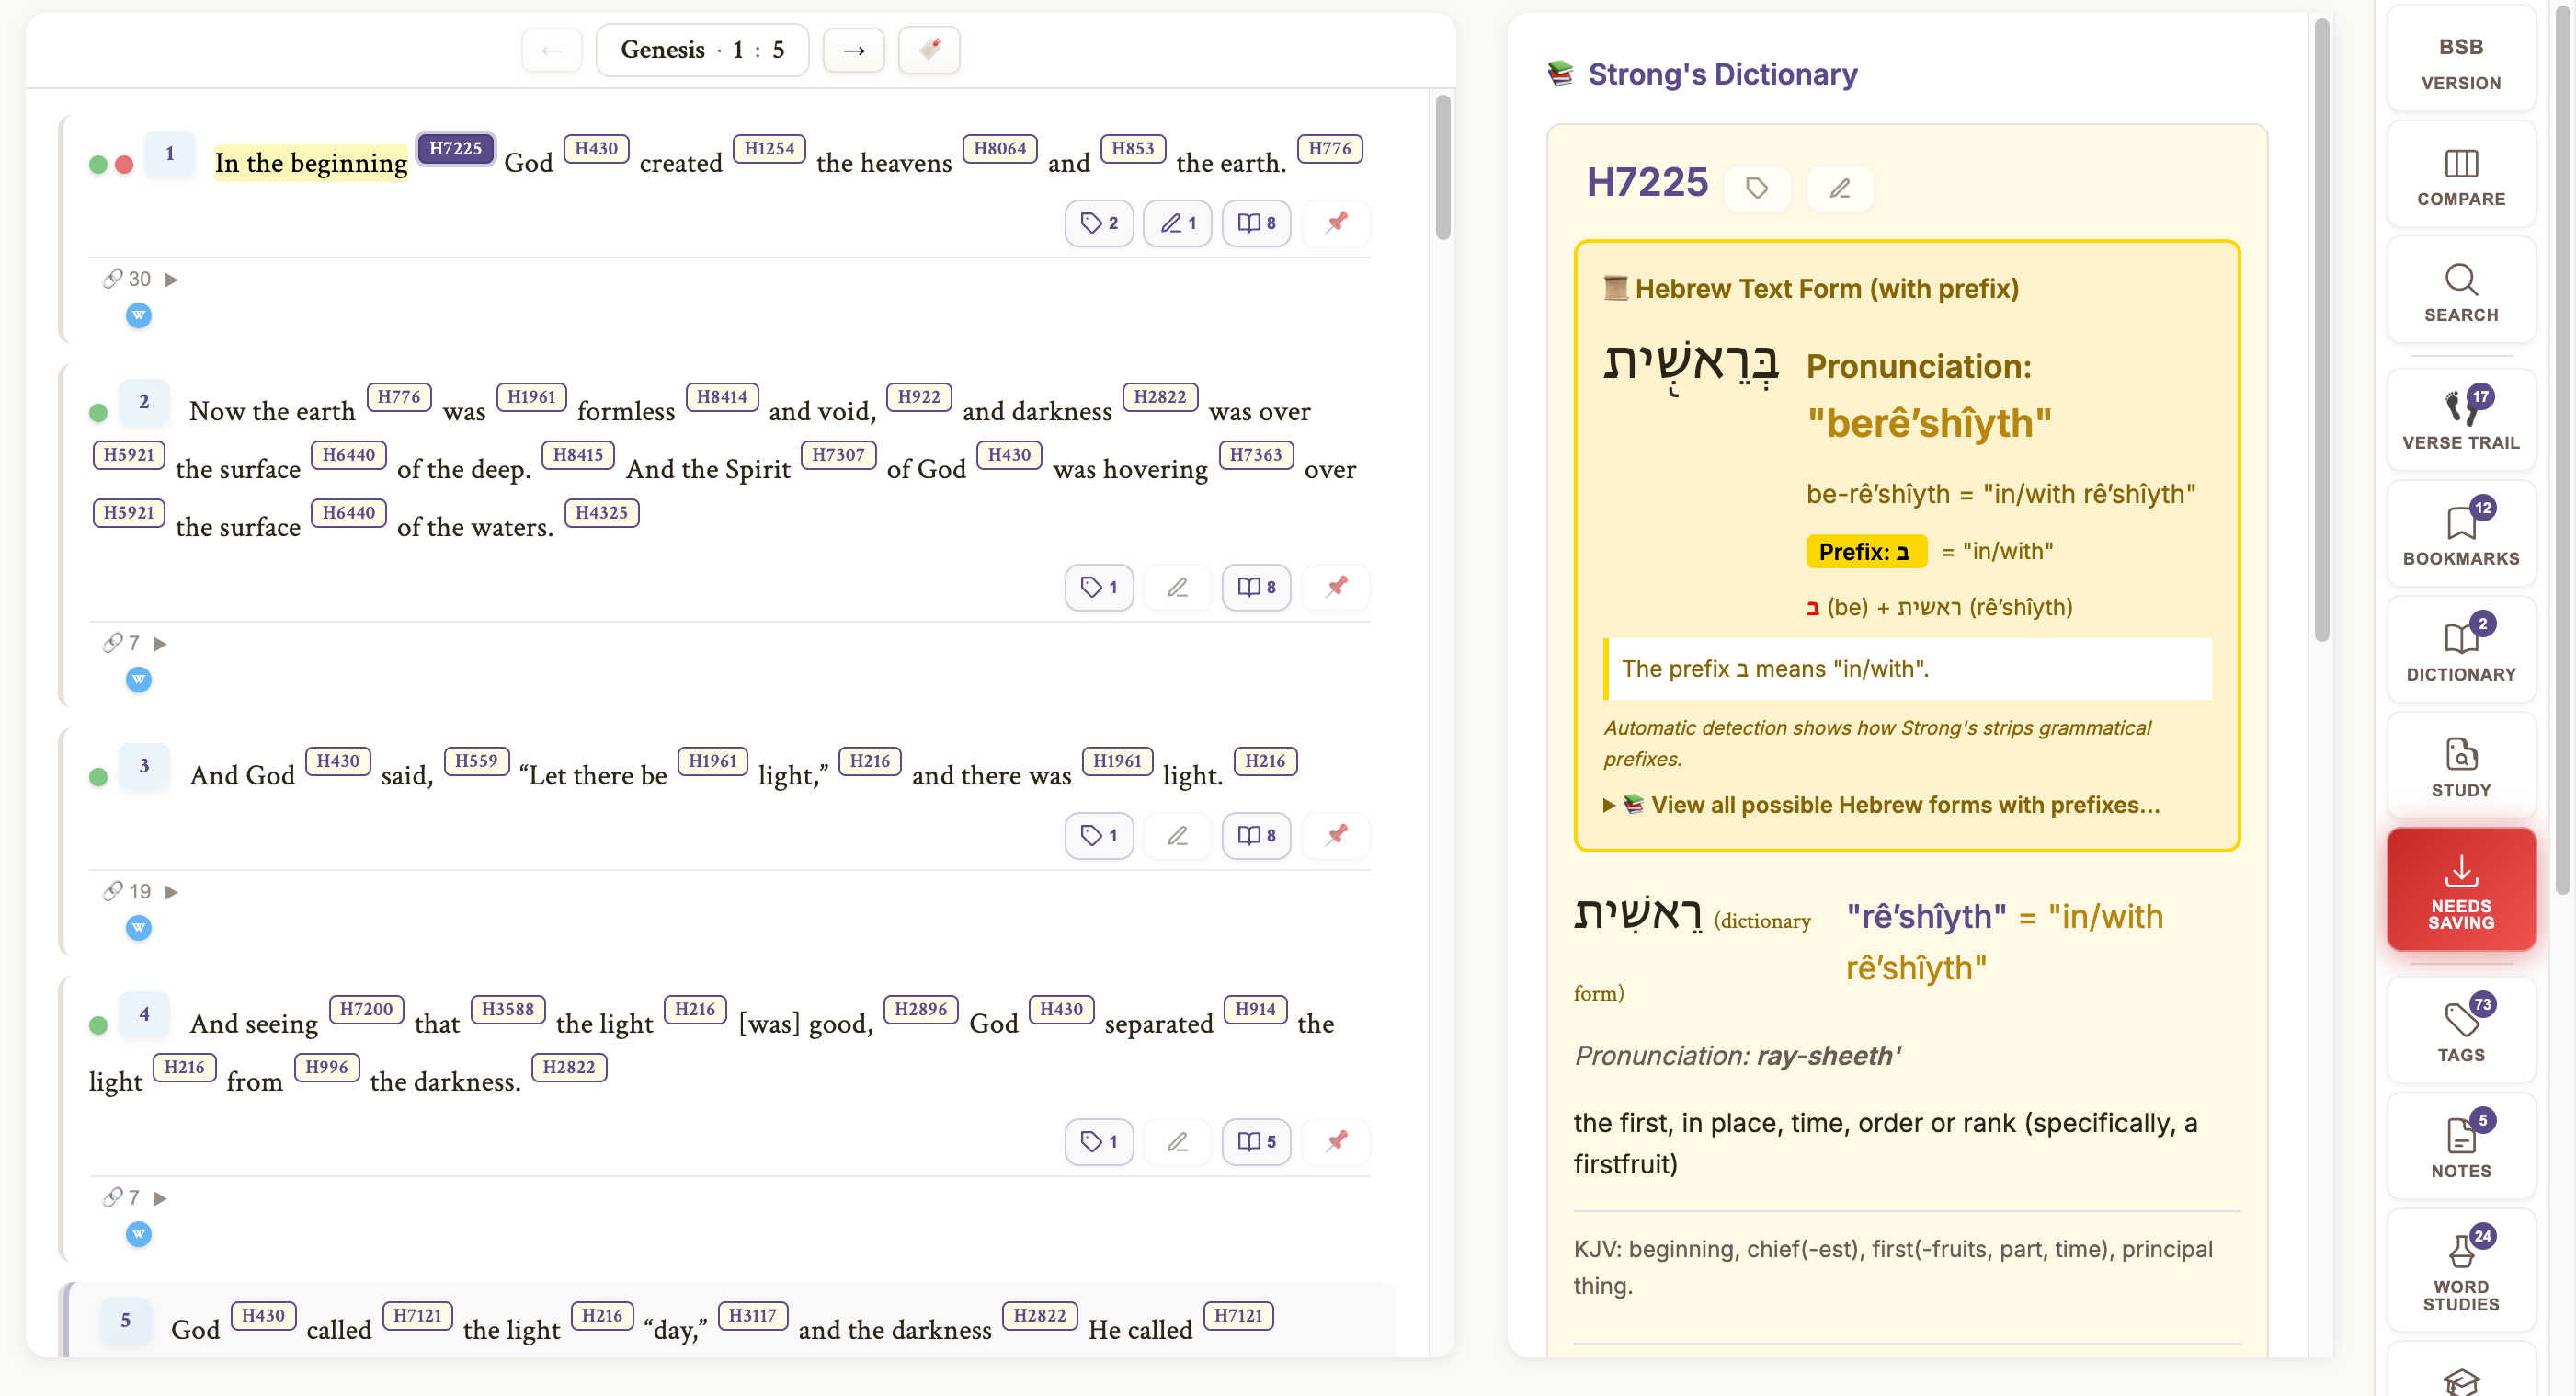
The layout consists of three main areas:
- Icon Navigation Rail — A vertical strip of buttons along the edge of the screen. This gives you one-click access to every major feature: Bible Version, Compare, Search, Library, ISBE, Verse Trail, Bookmarks, Dictionary, Study Console, Quick Save, Tags, Notes, Word Studies, Lexicon Study Center, Language Practice, Community, Help, Settings, and Account. You can flip this rail to the left or right side of the screen.
- Bible Reader — The central area where you read Scripture. Each verse is rendered as a rich, interactive card with Strong's numbers, action buttons, tag dots, and cross-references. The navigation bar at the top shows your current position as an interactive Book · Chapter : Verse reference.
- Sidebar — A context-sensitive panel on the opposite side from the nav rail. It shows Strong's definitions, bookmarks, notes, tags, search results, or word studies — depending on what you last clicked.
Free to Read, Account to Save
Scripture Toolkit is open to everyone. You can read all of it — every Bible text, every commentary, the Theology Library, the ISBE encyclopedia, the lexicons — without creating an account. The line is simple: reading is free; saving needs a free account.
The three ways to use the app
- Just visiting (no account) — Read everything, search everything, follow cross-references, build a verse trail, practice the original languages. Nothing you do is saved: when you leave, the visit is gone.
- Free account — Everything above, plus your work is saved and synced: bookmarks, tags, notes, highlights, word studies, your reading position, your settings, and up to 5 active studies + 5 archived. The Community Portal opens up too.
- Supporter — Everything in a free account with unlimited studies, and your subscription funds churches, scholarships, and ministries. See Account & Subscription.
What you'll see when you're not signed in
- A welcome message greets first-time visitors and explains the basics (it only appears once).
- A purple banner across the top reminds you that nothing is being saved. Dismissing it collapses it to a small "Free mode · Sign in" pill in the nav rail.
- Greyed-out buttons are the saving tools — bookmarks, tags, notes, studies, highlights. They're greyed because they save to an account you don't have yet. Clicking one explains and offers to create your free account.
- The Account button becomes a purple Sign in button.
What needs an account — at a glance
| Open to everyone | Free account required |
|---|---|
| Bible reading (all 16 texts) • Side-by-side comparison • Strong's numbers & dictionary panel • Cross-references & the Reference Popup • All 16 commentaries • Book & chapter introductions • Trilingual search • Theology Library reading • ISBE reading & search • Lexicon Study Center browsing • Original Language Practice • Verse Trail (for the visit) • Theme & font settings (for the visit) | Bookmarks • Notes (all kinds) • Tags (all three systems) • Highlights (Bible, Library, ISBE) • Studies & the Study Console • Send/pin to study (everywhere) • Word Studies • My Dictionary history • Community Portal • Settings that persist • Study Mode toggle • Verse Trail that's still there tomorrow |
Throughout this manual, each section carries one of these badges:
🔓 Open to everyone — no account needed 🔑 Free account required — this saves to your account
The Bible Reader
🔓 Reading is open to everyone — the saving actions on verse cards (send to study, tag, note, highlight) need a free account.
The Bible Reader is the heart of Scripture Toolkit. It includes 16 Bible texts — 13 translations in 6 languages, plus the original Hebrew, Greek, and Septuagint — all with full Strong's concordance tagging, meaning every Hebrew and Greek word is linked to its original-language definition. The Berean Standard Bible (BSB) is the default translation.
Verse Navigation Picker
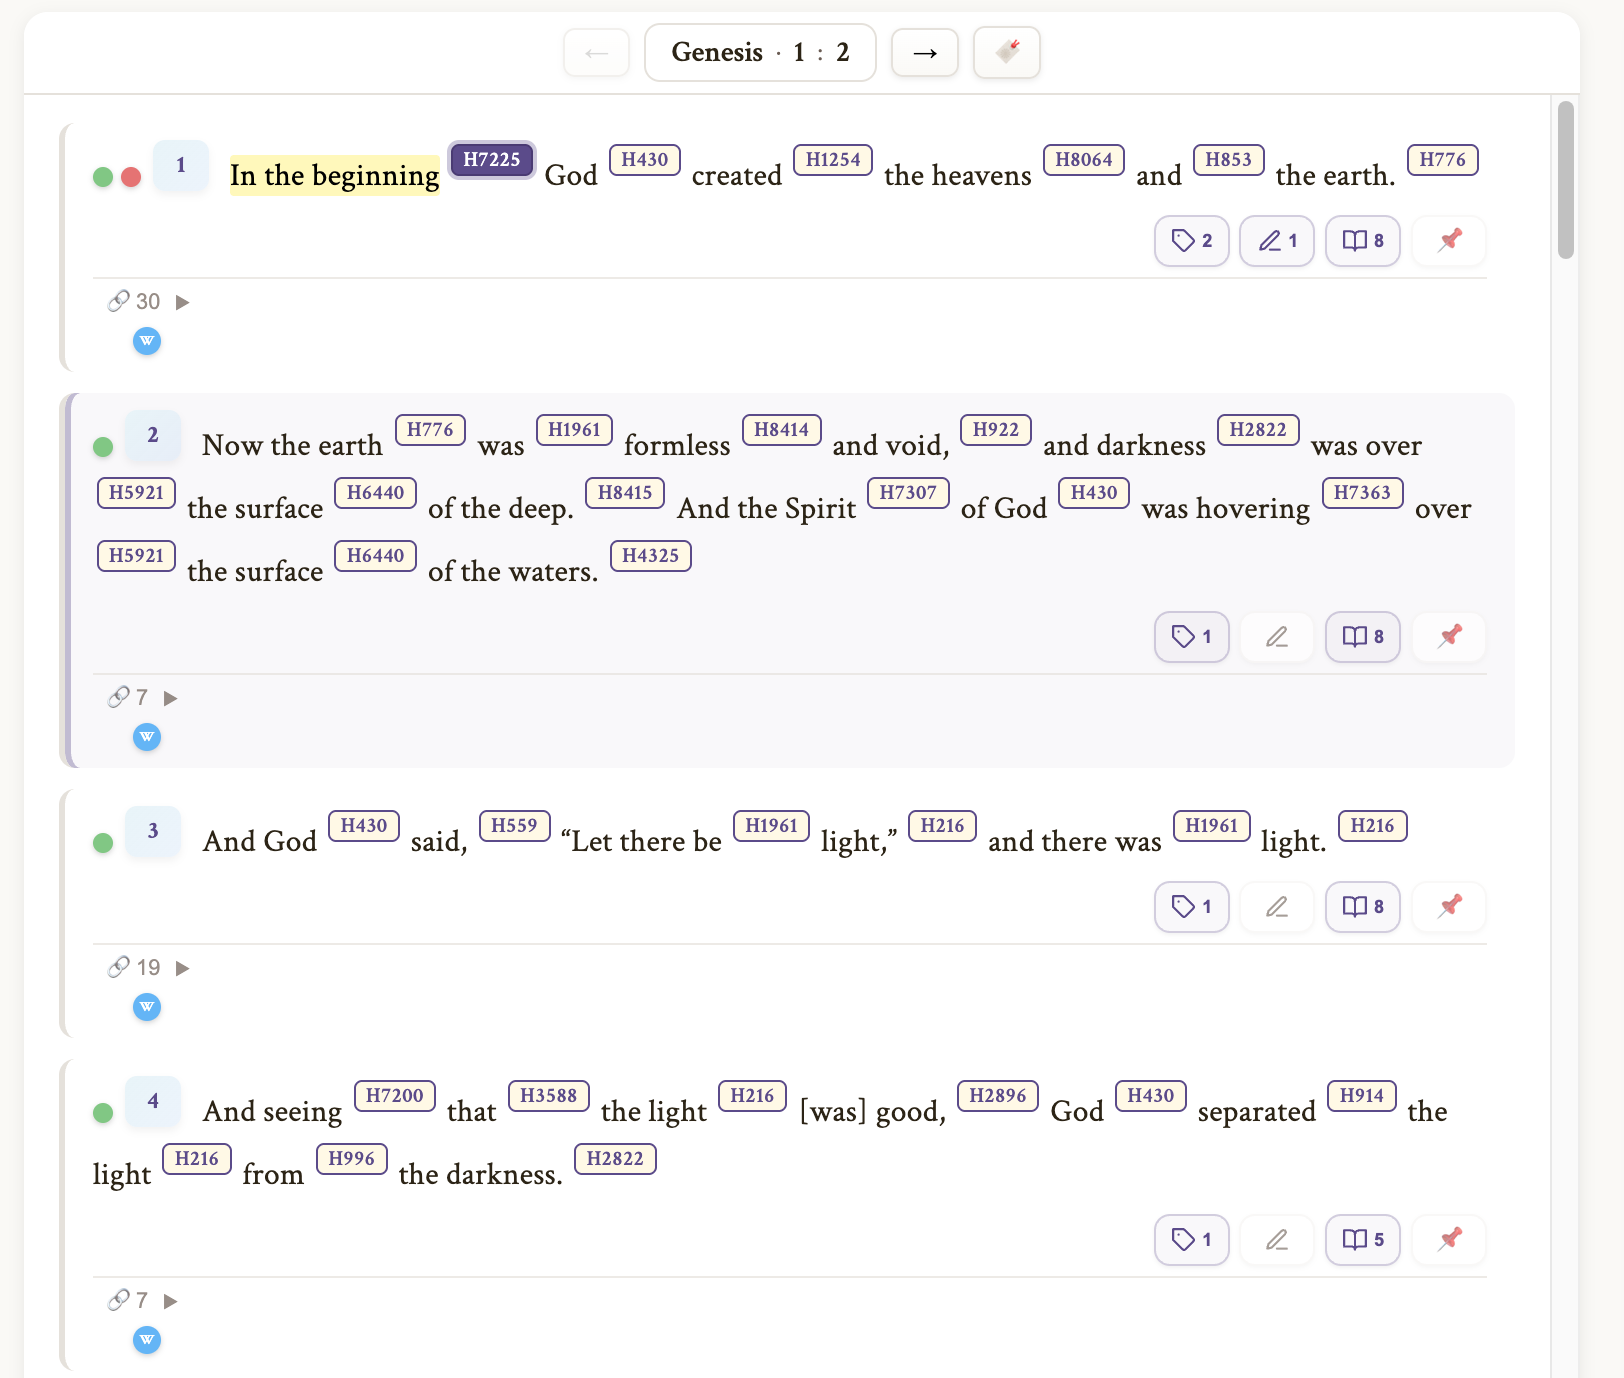
At the top of the Bible Reader, the navigation bar displays your current position as an interactive reference: Book · Chapter : Verse. Each segment is clickable and opens a visual picker panel.
- Book Segment — Click the book name (e.g., "Genesis") to open the Book Picker. All 66 books are displayed in a grid, organized under Old Testament and New Testament headers. Your current book is highlighted. Click any book to advance to the Chapter Picker.
- Chapter Segment — Click the chapter number to open the Chapter Picker. A number grid shows all chapters in the current book. Your current chapter is highlighted. Click any chapter to advance to the Verse Picker.
- Verse Segment — Click the verse number to open the Verse Picker. A number grid shows all verses in the current chapter. Your current verse is highlighted. Click any verse to scroll directly to it.
- Arrow Buttons (← →) — Navigate to the previous or next chapter. These bracket the reference display. When you reach the end of a book, they automatically advance to the next book.
- Send All (tray icon) — One click to send every verse in the current chapter to your study. Verses already collected are skipped, so you can click it again without duplicates.
The picker panel includes a back button to step back (Verse → Chapter → Book), a breadcrumb showing your current selection, and a close button. Click anywhere outside the picker to dismiss it.
With a free account, your reading position is automatically saved to the cloud — when you return to Scripture Toolkit on any device, it opens to exactly where you left off. (Visitors without an account start fresh each visit.)
Bible Translations
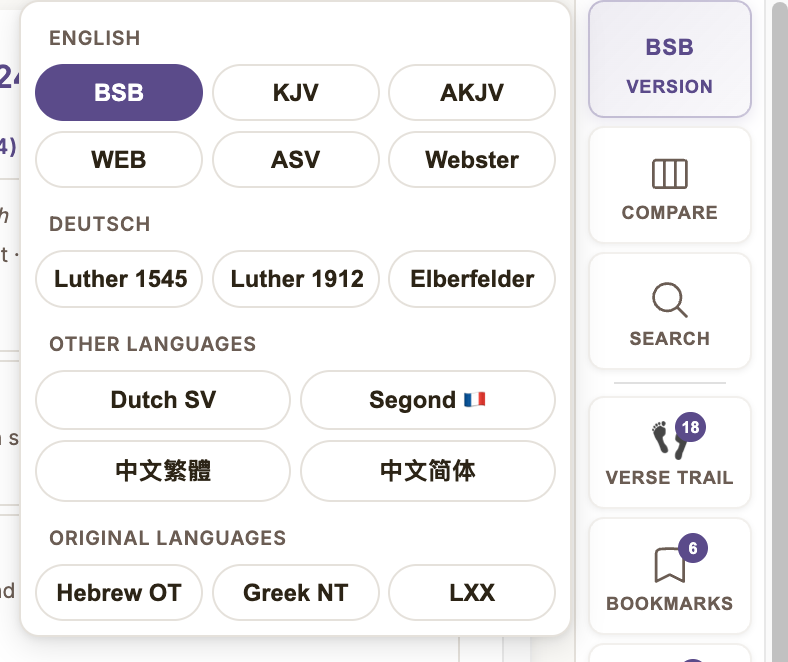
Scripture Toolkit includes 16 Bible texts — 13 translations in 6 languages plus 3 original-language texts, all with full Strong's concordance tagging for instant Hebrew and Greek lookups:
English (6 translations)
- BSB (Berean Standard Bible) — A modern, accurate translation in clear contemporary English. This is the default.
- KJV (King James Version) — The classic 1769 English translation familiar to generations of believers.
- AKJV (American King James Version) — The KJV with updated spelling and grammar for modern readability.
- WEB (World English Bible) — A modern public domain translation based on the ASV.
- ASV (American Standard Version) — The highly literal 1901 revision prized by scholars.
- Webster (Webster's Bible Translation) — Noah Webster's 1833 update of the KJV with American English.
German / Deutsch (3 translations)
- Luther 1545 — Martin Luther's original German translation of 1545.
- Luther 1912 — The 1912 revision of the Luther Bible in updated German.
- Elberfelder 1905 — A highly literal German translation valued for its accuracy.
Other Languages (4 translations)
- Dutch SV (Statenvertaling) — The classic 1637 Dutch Bible translation.
- Segond (Louis Segond) — The standard French Protestant Bible (1910).
- CUV 中文繁體 (Chinese Union Version) — Traditional Chinese, the most widely used Chinese Bible (1919).
- CUVS 中文简体 (Chinese Union Version Simplified) — Simplified Chinese edition.
Original Language Source Texts (3 texts)
- Hebrew OT — The original Hebrew Old Testament text with full Strong's tagging. Read the Scriptures in the language they were written in, with instant English lookups for every word.
- Greek NT — The original Greek New Testament text with full Strong's tagging.
- LXX (Septuagint) — The Greek Old Testament — the translation used by the early church and quoted throughout the New Testament. Selectable as its own text.
To switch translations, click the Version button on the navigation rail. A flyout appears with translations grouped by language. Click any translation to switch — the chapter reloads instantly. Your translation preference is saved to your account (for the visit only if you're not signed in).
Side-by-Side Comparison
Click the Compare button on the navigation rail to enter comparison mode. The Bible reader splits into two synchronized panes, each showing the same chapter in a different translation. Scroll one pane and the other follows.
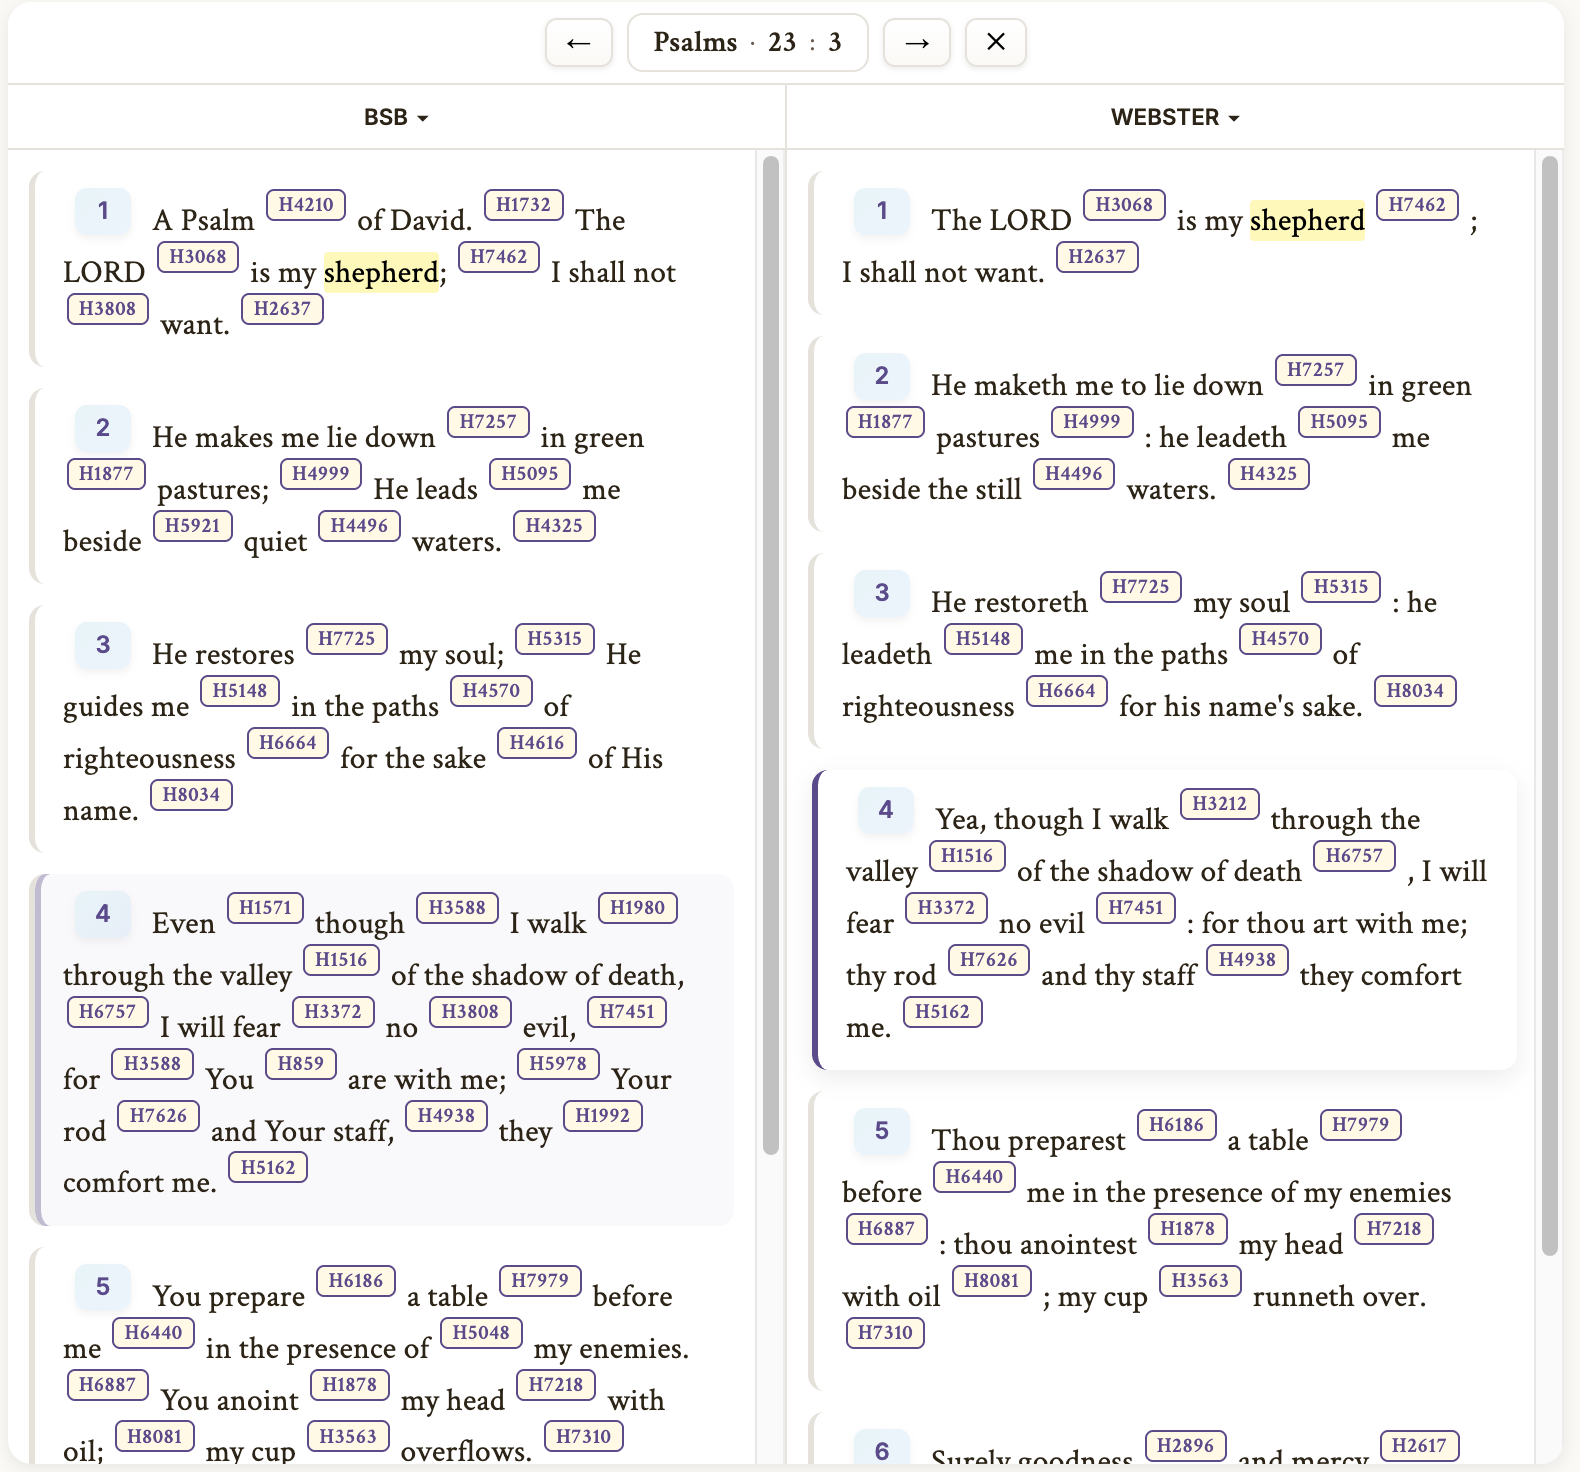
- Independent translation switching — Each pane has its own translation selector. Compare any two translations side by side.
- Synchronized scrolling — Both panes scroll together so the same verses stay aligned.
- Full Strong's support — Both panes have full Strong's concordance tagging. Click any number to see the definition.
- Chapter navigation — Use the arrows at the top to move through chapters. Both panes update together.
Click the × button in the comparison nav bar to exit comparison mode and return to the single-pane reader.
Verse Cards — a Clean Page, Tools on Touch
The reader is designed to read like a printed page. At rest, a verse shows only Scripture — no buttons, no badges, no markup. Each chapter opens under a printed page head (the book's name in small caps on the left, the chapter on the right) that scrolls away with the text, just like the top of a page in a bound Bible.
Two ways to read. The ¶ switch at the top of the reader (also in Settings) reflows the chapter between verse-by-verse — each verse on its own line, the study layout — and paragraphs, where verses flow together the way the text was written, with verse numbers as small gold marks in the running text. Every tool works identically in both: touch a verse in paragraph view and its capsule appears right beneath its last line. The paragraphing follows the Berean Standard Bible's printed paragraphs and applies to every translation.
Touch a verse to open its tools. Click anywhere on a verse (desktop) or swipe it right-to-left (mobile) and its full toolbar slides in as a floating capsule beside the verse — the text never moves. One verse opens at a time; touch the verse again (or open another) to put the tools away.

The capsule carries the full toolbox:
- Send to Study (tray icon) — Sends this verse into your current study. If study mode is off, you'll be prompted to name a new study first. (See Study Console.)
- Tag Button (🏷) — Opens the Tag Picker for this verse. Create new tags, assign existing tags, or remove tags. Tag dots appear beside the verse number while the verse is open. (See Tags.)
- Notes Button (📝) — Opens the Notes Dialog for this verse. Write, edit, and delete Bible notes (personal and private — never shared). A count badge appears when notes exist. (See Notes.)
- Cross-Reference Toggle (🔗) — Shows the number of cross-references available. Click to expand a panel showing all related verses, grouped by book. Click any reference to open it in a floating popup without losing your place. (See Cross-References.)
- Commentary Button (📖) — Opens the commentary panel for this verse. A count badge shows how many commentary sources have content here.
- Share — Copies a link that lands the recipient on this exact verse. Because reading is open to everyone, whoever you send it to is instantly in the Word — no account needed.
The verse number carries your marks. The small gold numeral quietly reports the verse's state: it fills into a green chip when the verse carries tags or notes, a purple chip marks the verse you're currently reading (it follows as you scroll), and a split chip means both. The text itself never shifts.
Strong's numbers and encyclopedia links sleep with the tools. At rest the text is pure Scripture; touching a verse wakes its superscript Strong's numbers and blue encyclopedia words along with the capsule. Tapping a sleeping word simply opens the verse. (The header's Strong's and ISBE toggles still govern both globally.)
Strong's Numbers
Strong's Numbers are the foundation of deep Bible study. Every word in all 16 Bible texts is linked to James Strong's numbering system, which maps words to their original Hebrew (Old Testament, prefixed with "H") or Greek (New Testament, prefixed with "G") words.
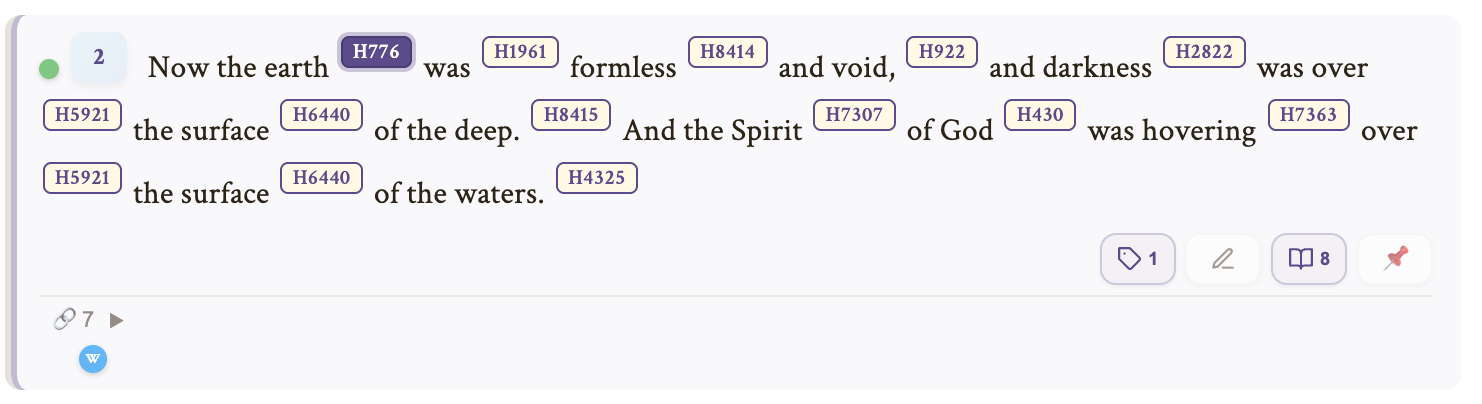
When you click a Strong's number in the verse text:
- The sidebar switches to the Strong's Dictionary view
- You see the full definition including: the original word (lemma), transliteration, pronunciation guide, Strong's definition, and related words
- For Hebrew words, you also see a letter-by-letter analysis with the pictographic meaning of each Hebrew letter, revealing deeper layers of meaning
- The word is recorded in your Dictionary history and persists across sessions
Hebrew Prefix Detection
Hebrew often attaches small prefixes to a word — the, and, in, to, like, from. When a word in the text carries one, the dictionary shows the actual form alongside the root, identifies the prefix and its meaning, and gives a short grammar note — so you always know exactly what you're reading.
The Word's Tabs
- Letters — each Hebrew or Greek letter with its name and ancient picture-meaning
- Anagrams — other real words formed from the same letters, grouped into words, names, and places
- References — every verse in the Bible that uses this exact word, grouped by book
- BDB / Abbott-Smith — the extended scholarly lexicon entry, with a “Deeper Word Study” button
Cross-References
Cross-references connect related verses across the entire Bible. They help you see how themes, prophecies, and teachings echo throughout Scripture.
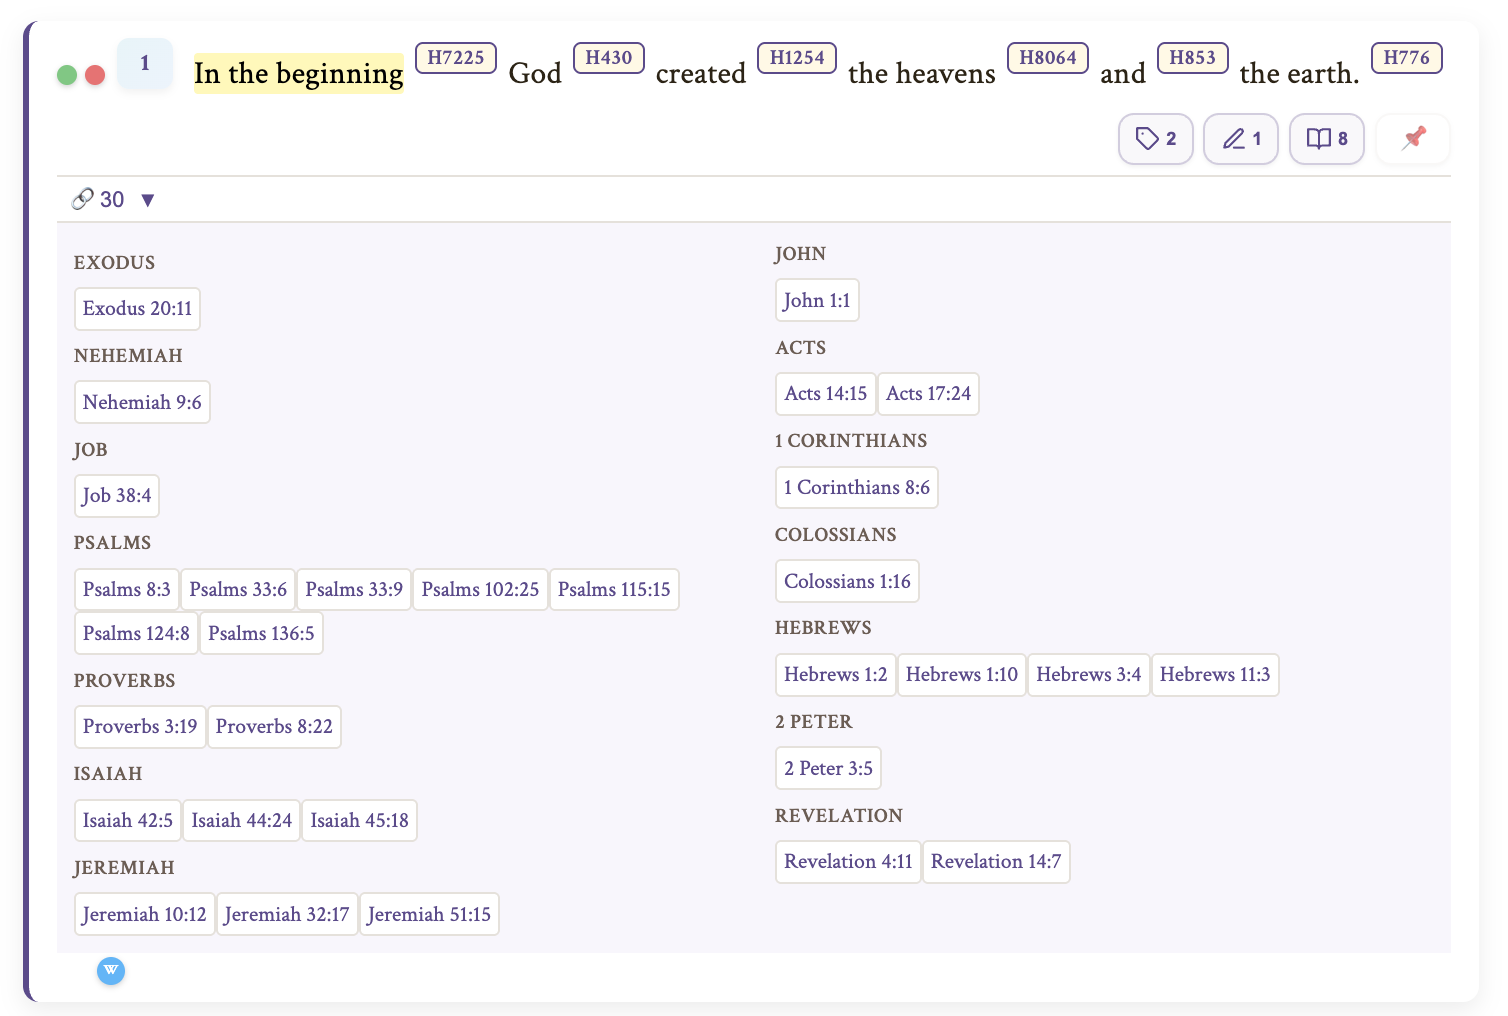
Each verse shows a cross-reference count (e.g., "🔗 12"). Click to expand the panel:
- References are grouped by book for easy scanning
- Click any reference to open it in a floating popup — you can read the verse, send it to your study, tag it, or add notes without leaving your current chapter
- The popup has a trail — follow cross-references within cross-references, and the trail remembers everywhere you've been
- Click the toggle again to collapse the panel
Verses with no known cross-references have their toggle button automatically hidden.
Bible Commentary
Scripture Toolkit includes 16 classic Bible commentary sources, all freely available public domain works from respected theologians spanning centuries of scholarship. Commentary is available verse-by-verse and accessible directly from each verse card.
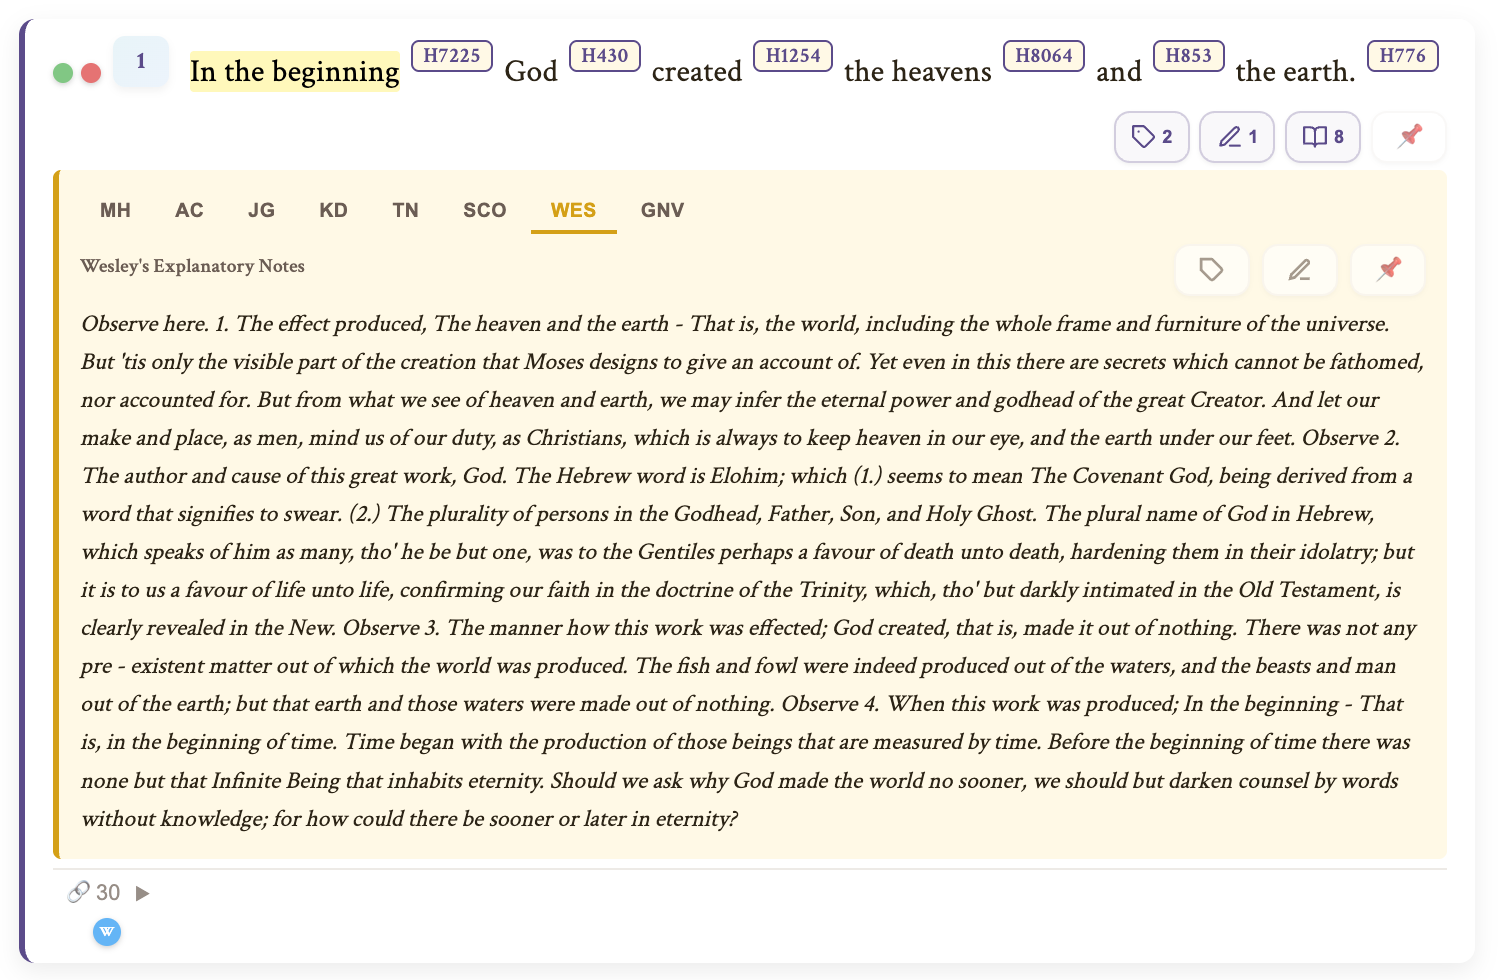
Accessing Commentary
Each verse card includes a commentary button with a count badge showing how many sources have content for that verse. Click it to open the commentary panel right beneath the verse, where you can read and compare insights from multiple scholars on the same verse.
- Source badges appear automatically on verse cards when commentary is available
- Click any source tab in the commentary panel to switch between commentators
- Commentary text includes clickable verse references that open in the Bible Reference Popup, so you can follow a commentator's cross-references without losing your place
- Add commentary to your study by clicking the add button — the commentary card appears in your Study Console's verse panel
Commentary in the Study Console
When you add commentary to a study, it appears as a commentary card in the verse panel alongside your verse cards. Commentary cards can be:
- Tagged — using the same tag system as verse cards
- Noted — add personal notes on specific commentary passages
- Reordered — drag to arrange alongside your verse cards
- Injected into study text — click "→ Text" to insert the commentary into your study editor
Available Commentary Sources
The following table shows all 16 commentary sources included with Scripture Toolkit. Coverage indicates which parts of the Bible each source covers.
| Source | Abbr | Coverage | Description |
|---|---|---|---|
| Matthew Henry | MH | Full Bible | Devotional and practical commentary (1706). One of the most beloved commentaries in Christian history. |
| Adam Clarke | AC | Full Bible | Detailed scholarly commentary with attention to original languages (1810–1826). |
| John Gill | JG | Full Bible | Exhaustive verse-by-verse exposition with extensive cross-referencing (1746–1766). The most detailed source in our collection. |
| Jamieson, Fausset & Brown | JFB | Full Bible | Critical and explanatory commentary by three Scottish ministers (1871). Balances scholarship with accessibility. |
| Keil & Delitzsch | KD | Old Testament | The gold standard for OT Hebrew scholarship (1857–1878). Deep analysis of Hebrew grammar and ancient Near Eastern context. |
| Scofield Reference Notes | SCO | Full Bible | Influential dispensationalist reference notes (1917 edition). Widely used for prophetic and typological study. |
| Wesley's Explanatory Notes | WES | Full Bible | John Wesley's concise and practical commentary (1755). Foundational to the Methodist tradition. |
| Geneva Study Bible | GNV | Full Bible | Study notes from the 1599 Geneva Bible, favoured by the Puritans and Reformers. Historically significant as the Bible of Shakespeare's era. |
| Barnes' Notes | BRN | New Testament | Albert Barnes' accessible and widely-read NT commentary (1832–1851). Known for clear, readable explanations. |
| People's New Testament | PNT | New Testament | B.W. Johnson's commentary written for everyday readers (1891). Practical and straightforward. |
| Calvin's Commentaries | CAL | Selected books | John Calvin's landmark Reformation commentaries (16th century). Covers most of the Old and New Testaments. |
| Ryle's Expository Thoughts | RYL | Gospels | J.C. Ryle's warm, practical exposition of Matthew, Mark, Luke, and John (1856–1873). |
| Spurgeon's Treasury of David | SPG | Psalms | Charles Spurgeon's monumental devotional commentary on the Psalms (1885). |
| Poole's Annotations | POL | Full Bible | Matthew Poole's concise verse-by-verse annotations (1683). |
| The Pulpit Commentary | PUL | Full Bible | A comprehensive homiletic commentary by a team of scholars (1880s), rich with exposition and sermon material. |
| ISBE (1915) | ISBE | Full Bible | Verse-linked reference material from the International Standard Bible Encyclopedia (1915). See also the full ISBE Encyclopedia. |
All 16 commentary sources are public domain. Credits and licensing details are shown in Settings.
Text Highlighting
🔑 Free account required — highlights save to your account
Highlight words and phrases directly in your Bible text, just like marking up a physical Bible with colored highlighters. Highlights are permanent — they persist across sessions and are tied to your account, not to any particular study.
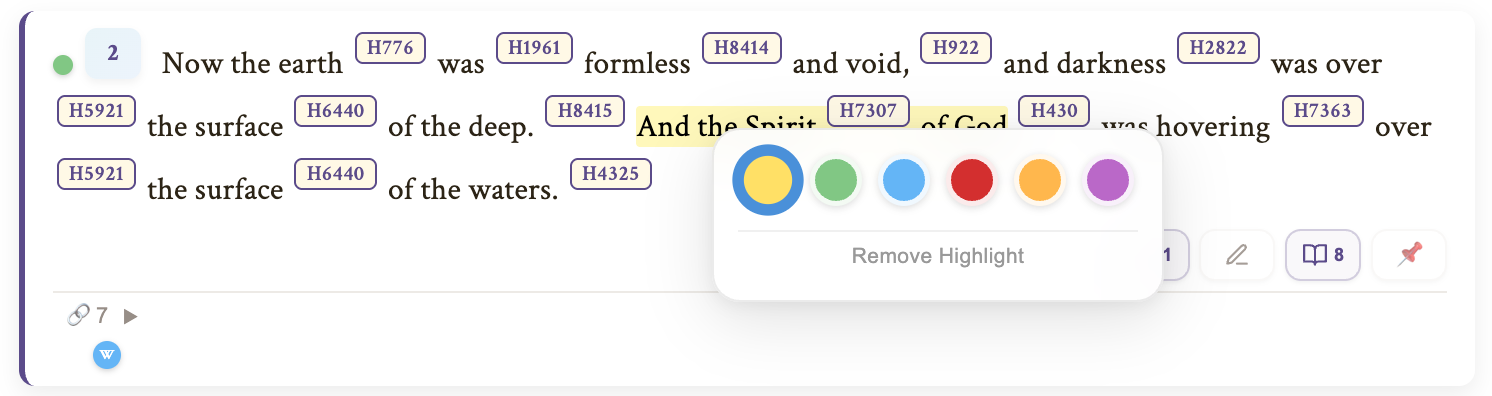
How to Highlight
- Select text — Click and drag to select a word or phrase within any verse
- Right-click — A highlight menu appears with six color options
- Pick a color — Click one of the color circles (yellow, green, blue, pink, orange, or purple) and the text is instantly highlighted
Changing or Removing Highlights
- Change color: Right-click on any highlighted text to reopen the color picker. The current color is indicated. Click a different color to switch.
- Remove: Right-click on highlighted text and click Remove Highlight at the bottom of the menu.
Where Highlights Appear
Your highlights are visible everywhere a verse is rendered:
- The main Bible reader
- Bible Reference Popup (cross-reference trail)
- Study Console verse cards
- Bookmark listings and search results
Good to Know
- Highlights are independent of Strong's numbers — toggling Strong's numbers on or off does not affect your highlights
- You can have multiple highlights per verse in different colors on different phrases
- Highlights are stored against the exact text of the verse. If you switch Bible translations, highlights made in one translation will not appear in another, since the wording differs. They reappear when you switch back.
- Each highlight is saved immediately to your account — no need to manually save
Book & Chapter Introductions
🔓 Reading is open to everyone — tagging, noting, and pinning an intro to a study need a free account.
Before you dig into the verses, get the big picture. Scripture Toolkit includes introductions to every book and chapter, drawn from 11 classic reference sources — who wrote the book, when, its themes, structure, and background.
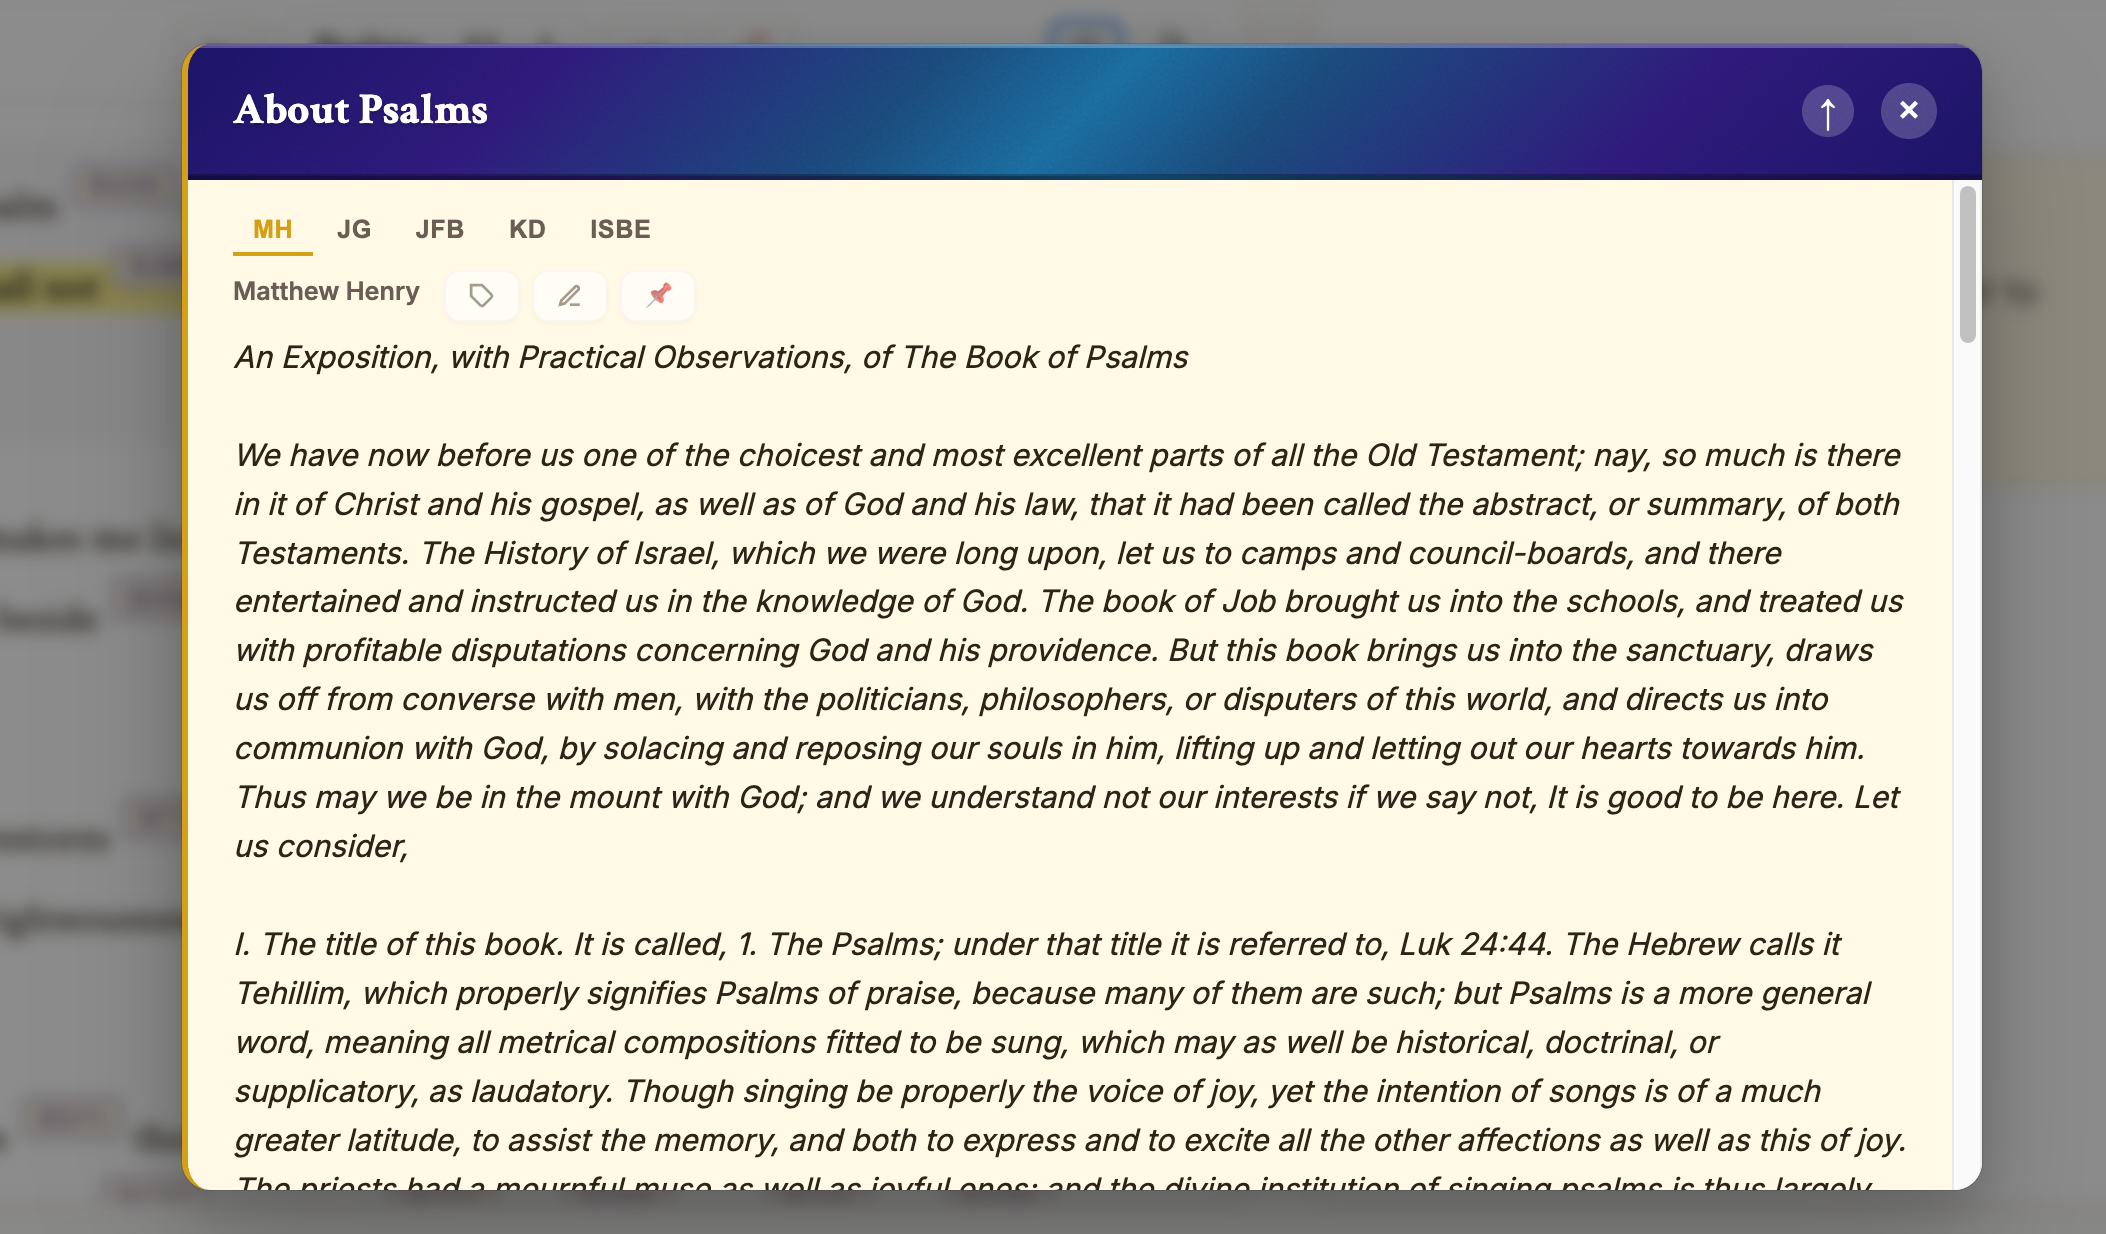
Opening an Introduction
From the reader's menu, choose About this book or About this chapter. These options appear only when introduction content exists for your current location. An overlay opens titled “About [Book]” or “About [Book] [Chapter]”.
Multiple Sources, Tabbed
Each introduction is organized into tabs — one per source. The 11 sources that provide introductions are Matthew Henry, Adam Clarke, John Gill, Jamieson-Fausset-Brown, Keil & Delitzsch (OT), Scofield, Wesley, the Geneva Study Bible, Barnes (NT), People's New Testament (NT), and the International Standard Bible Encyclopedia. Click any tab to switch sources.
- Bible references inside the text are clickable — they open in the Bible Reference Popup so you can follow them without losing your place
- Each introduction has tag and note buttons, just like verses and commentary
- Use the pin icon (🔖) to add the whole introduction to your active study as an intro card
- Select any text, right-click, and choose Send to Study to drop a quoted excerpt into your study text
My Dictionary
🔑 Free account required — the tracked history saves to your account (viewing Strong's definitions is open to everyone)
The Dictionary sidebar shows every Strong's word you've explored — it builds itself automatically as you study. Every Strong's number you look up while in study mode is recorded, with a running count of how many times you've viewed it and a link back to the last verse where you clicked it. When you save a study, the words you explored during it are captured with the study, so loading that study brings its word list back.
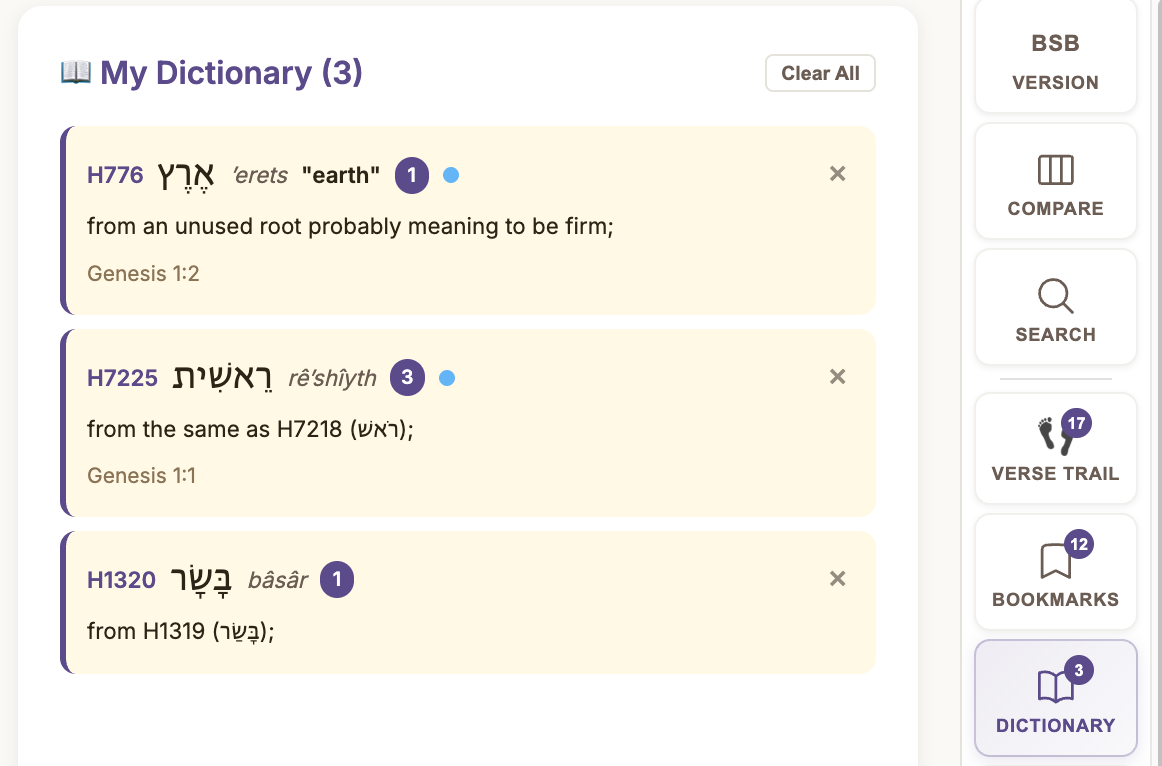
- Each entry shows the Strong's number, original word, transliteration, and any tag dots
- Click any entry to reload its full definition in the sidebar
- Words that you interact with — by tagging them, adding study notes, or sending them to a study — are automatically tracked as studied words and appear in the Lexicon Study Center's My Words tab
- Use "Clear All" to clear the visible history list
Strong's Dictionary (Sidebar Detail)
When you click any Strong's number in the Bible text, the sidebar switches to show the full dictionary entry:
- Lemma — The original Hebrew or Greek word in its root form
- Transliteration — How the word sounds in English letters
- Strong's Definition — The classic Strong's concordance meaning
- Letter Analysis (Hebrew only) — Each Hebrew letter with its name, pictographic symbol, and symbolic meaning
- Word Study Button — Opens the Lexicon Study Center for extended research
Below the definition sits a tab row — Letters · Anagrams · Refs · BDB (or Abbott-Smith for Greek). The dictionary tab opens first whenever the word has a full lexicon entry, putting the richest definition front and center; the Letters analysis is one click away.
Bookmarks
🔑 Free account required — bookmarks save to your account
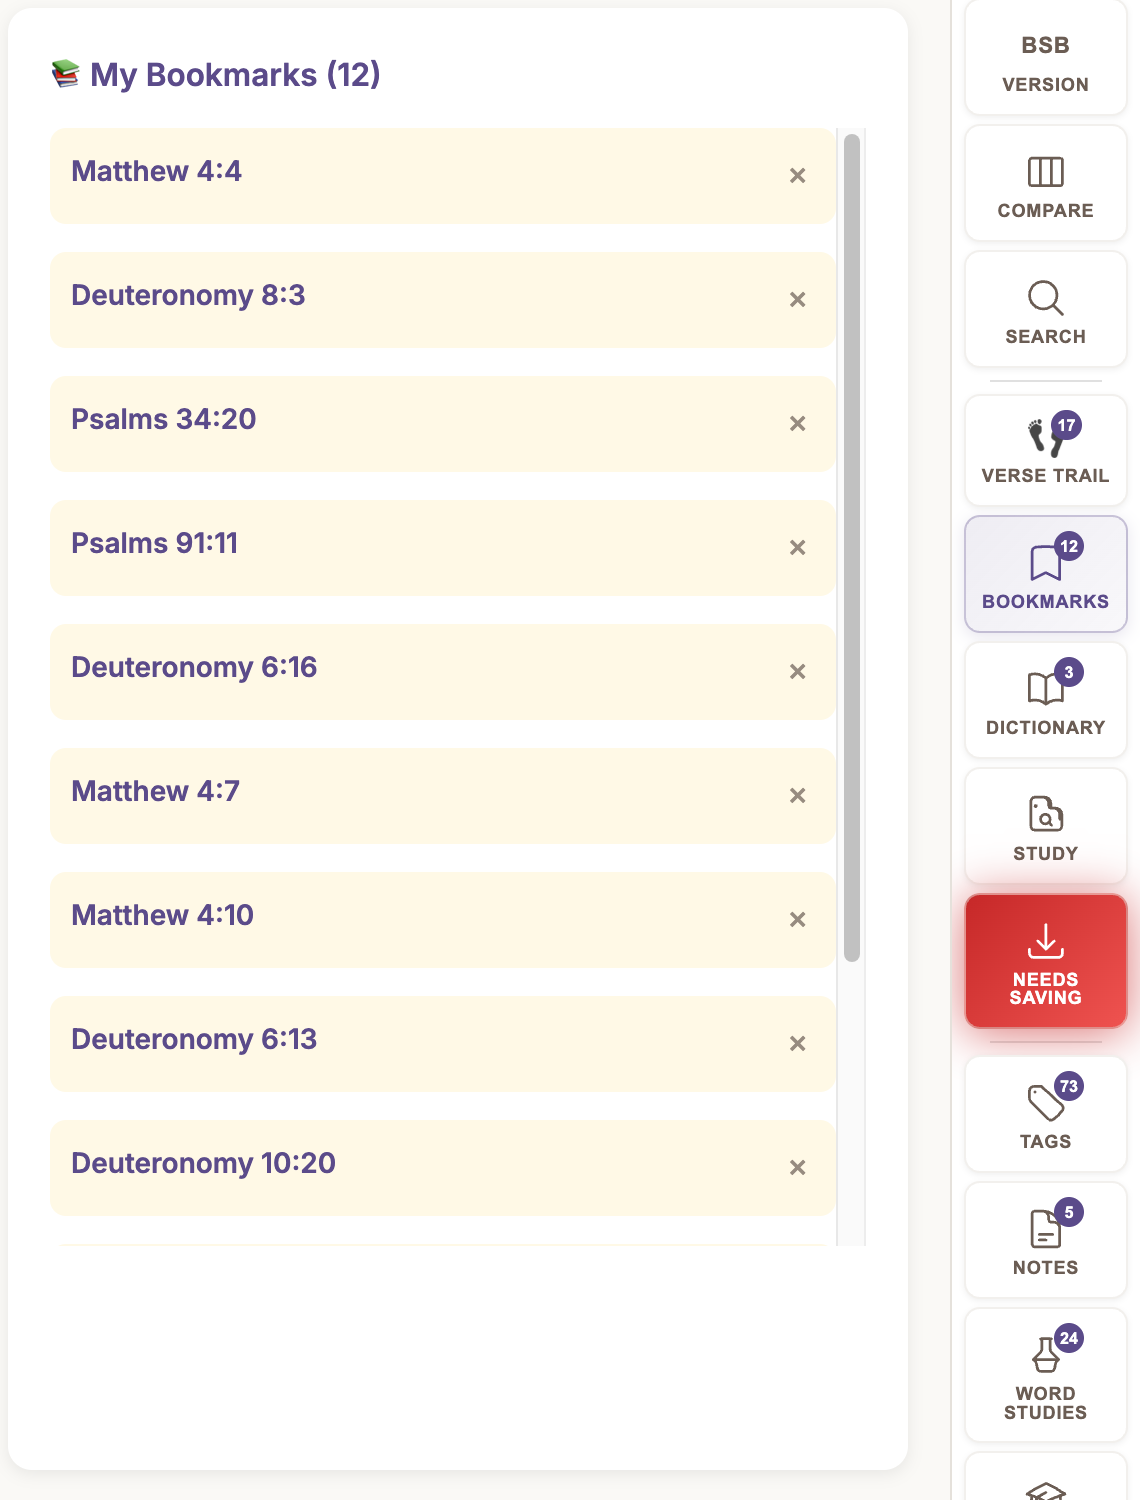
Bookmarks let you save verses for quick reference. They persist to your account and are tracked per translation — a verse bookmarked in the BSB is separate from the same verse in the KJV, and each reappears when you switch back to that translation. Your bookmarks follow you to every device.
- Touch a verse and click its Send to Study (tray) button
- Open the Bookmarks panel from the nav rail to see all bookmarks
- Click any bookmark to navigate directly to that verse
- Click the × button to remove a bookmark
- Use Send All (tray icon) in the reader bar to send every verse in the current chapter
- When a study is open, each verse you bookmark is also added to that study as a verse card — and removing the bookmark removes the card
- Export / Import — save all your bookmarks to a dated JSON file and import them back later, so your bookmarks are always yours to keep
- Bookmarking with study mode off: Since bookmarks belong to a study, bookmarking a verse when study mode is off will prompt you to name and start a new study. Study mode turns on, the study is created, and the bookmark is added. Cancel the prompt if you'd rather not start a study. (See Study Mode.)
Notes
🔑 Free account required — all notes save to your account
Scripture Toolkit keeps several kinds of notes, each for a different purpose. The two you'll use most are Bible Notes (permanent and private, attached to a verse) and Study Notes (part of a study, and shared when you post it). You can also write permanent notes on commentary entries, Library passages, introductions, and ISBE articles.
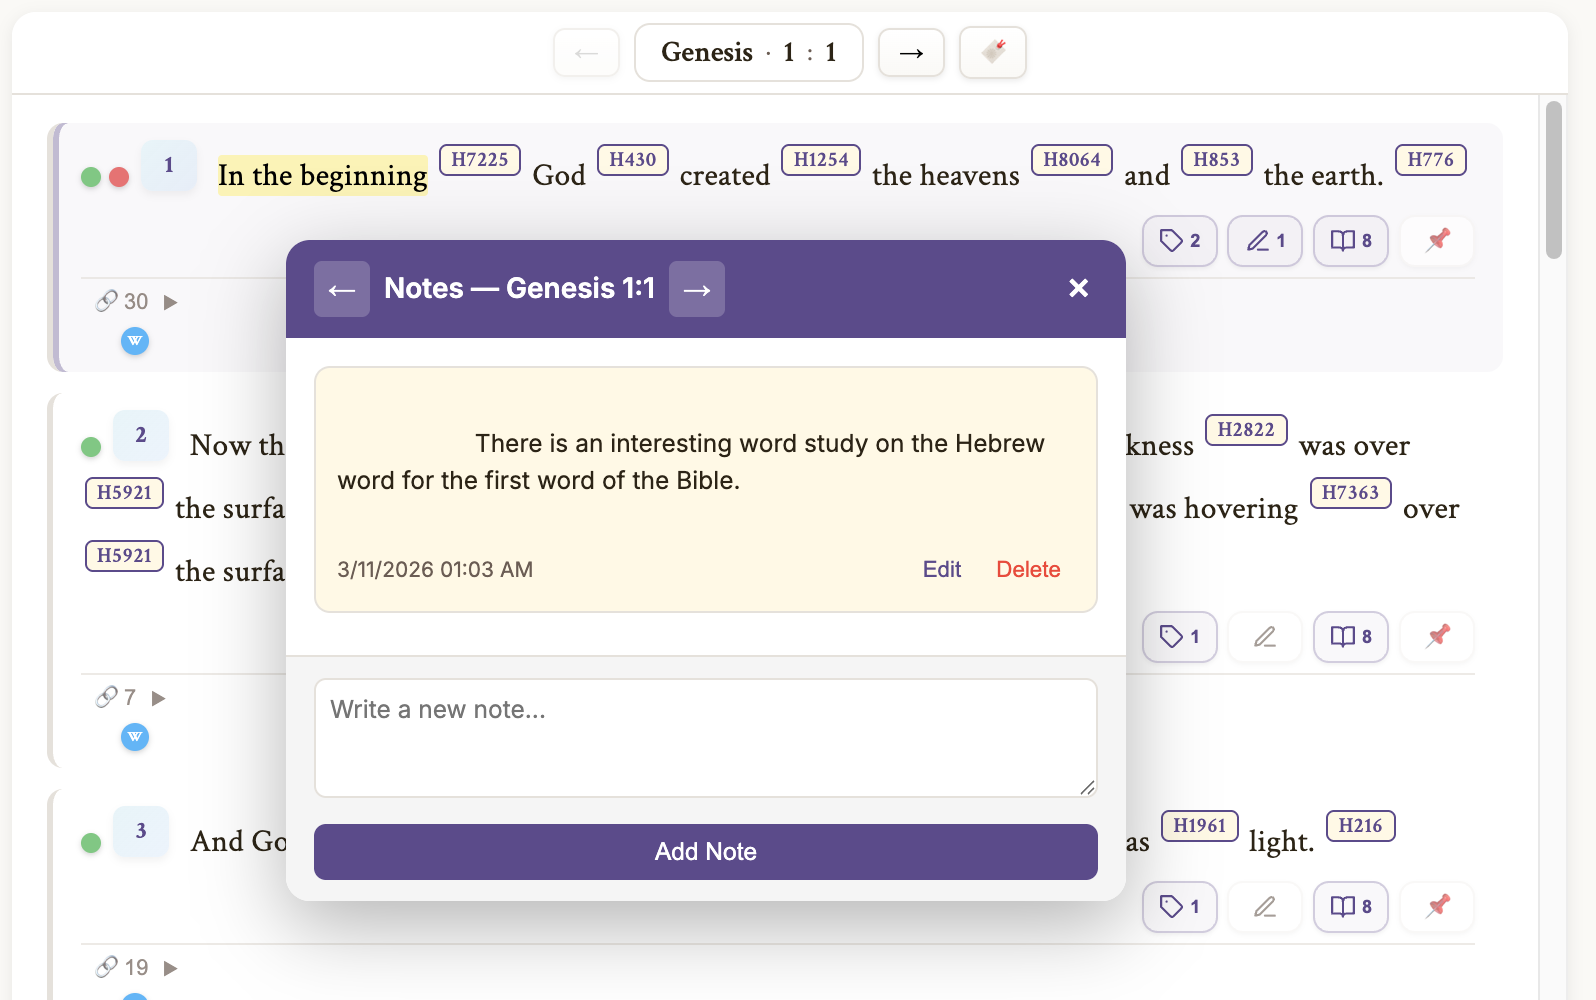
Bible Notes ("My Notes") — Personal & Private
Bible notes are your personal, private notes on individual verses. They are permanently attached to the verse itself — not to any study. They persist forever across all your studies and devices.
- Click the 📝 button on any verse card in the Bible Reader to open the Notes Dialog
- Write your thoughts, insights, or observations
- A count badge on the verse shows how many notes exist
- The Notes sidebar panel lists all your Bible notes across the entire Bible — click any to navigate to that verse
- Bible notes are never shared. They do not appear when you post a study to the Community Portal.
Study Notes — Per-Verse in the Study Console
Study notes are written inside the Study Console, attached to individual verse cards within a study. They are part of the study itself and are shared when you post a study to the Community Portal.
- Study notes live inside the Study Console, not on Bible verse cards
- They are saved and loaded with the study
- When you share a study, study notes are included alongside the verses
Notes on Commentary, Library, Intros & ISBE
Beyond verses, you can attach permanent, private notes to other content too. Each has its own notes dialog, opened from a note button on that item:
- Commentary notes — on a specific commentary entry (source + verse)
- Library notes — on a specific paragraph of a Library work
- Intro notes — on a book or chapter introduction
- ISBE notes — on an encyclopedia article
Like Bible Notes, these are permanent and private — they stay attached to that content across all your studies and are never shared. (The per-card Study Notes you add inside a study are separate, and travel with the study.)
Trilingual Search
🔓 Open to everyone — no account needed
Scripture Toolkit's search works across three languages simultaneously: English, Hebrew, and Greek. You can search for English words, Strong's numbers (e.g., "H7225" for "beginning"), or transliterated original-language words.
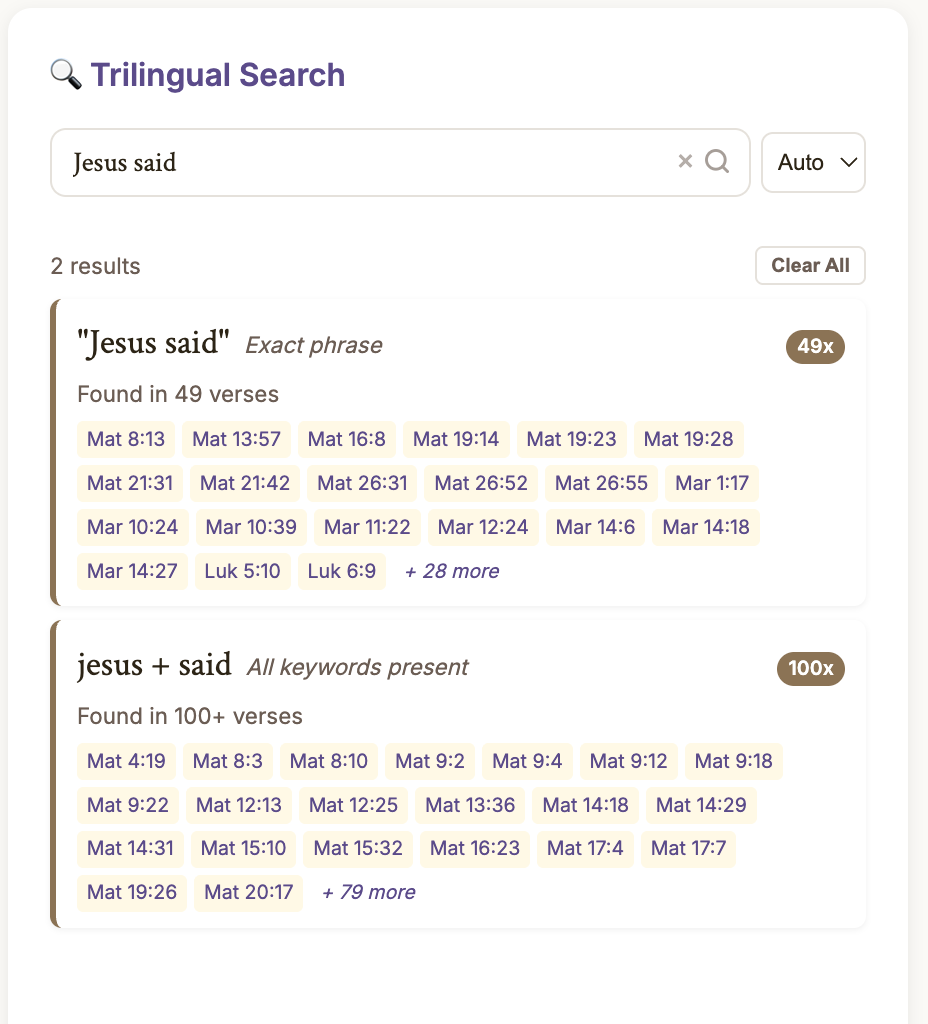
- Type your query and press Enter
- Choose your search language — Auto, English, Hebrew, or Greek. Auto detects the language as you type; for Hebrew or Greek, an on-screen keyboard appears so you can enter original-language characters.
- Results show as cards: Strong's matches show the word with all its verse occurrences, and text matches show verses containing the English word
- Click verse references to navigate directly to that verse, with your search term highlighted
- Expand "+ N more" to see all occurrences; collapse back to the preview
- Remove individual result cards with the × button, or clear all results
Tags — Three Independent Systems
🔑 Free account required — tags save to your account
Scripture Toolkit has three completely independent tagging systems. Each serves a different purpose, and they never interfere with one another. Tags are color-coded, so you can visually identify themes at a glance.
Bible Tags (Permanent)
Bible tags are permanent. They stay forever, independent of any study. Use them for long-term study themes like "Prophecy," "Grace," "Covenant," "Prayer," etc.
- Click the 🏷 button on any verse to open the Tag Picker. A "Bible" or "Study" badge tells you which layer you're working in — Bible when tagging from the reader, Study when tagging from the Study Console
- Create a new tag by typing a name and choosing a color
- Click an existing tag chip to assign/unassign it from the verse
- Bible tags show as solid colored dots before the verse number
- Clicking a Bible tag verse ref in the sidebar navigates to that verse in the main reader
Study Tags (Per-Study)
Study tags let you organize verses within the context of a specific study. The tag definitions (names and colors) persist forever, but the assignments (which verses have which tags) are saved and restored per study.
- Study tags appear in the Tag Picker when you're working on a study
- They show as dashed-outline dots before the verse number — visually distinct from Bible tags
- When you save a study, all study tag assignments are saved with it
- When you load a different study, the assignments switch automatically
- When you start a new study, study tag assignments are cleared
- Clicking a Study tag verse ref in the sidebar opens the Study Console
Word Tags (Lexicon)
Word tags are applied to Strong's numbers, not verses. This means tagging a word once marks it everywhere it appears in the entire Bible. Use these for linguistic themes like "Root: love," "Verb form: imperative," or "Key theological term."
- Word tags are available in the Tag Picker when viewing a word in the Lexicon Study Center or the sidebar Strong's view
- They are permanent forever — not tied to any study
- They show as "W" circle dots in a second row below verses that contain tagged words
- Tagging a word automatically makes it a "studied word" — it will appear in the Lexicon Study Center's My Words tab
- Clicking a Word tag entry in the sidebar opens the Lexicon Study Center with that word displayed
Tag Dots on Verses
Every verse in the Bible reader shows up to three layers of tag indicators:
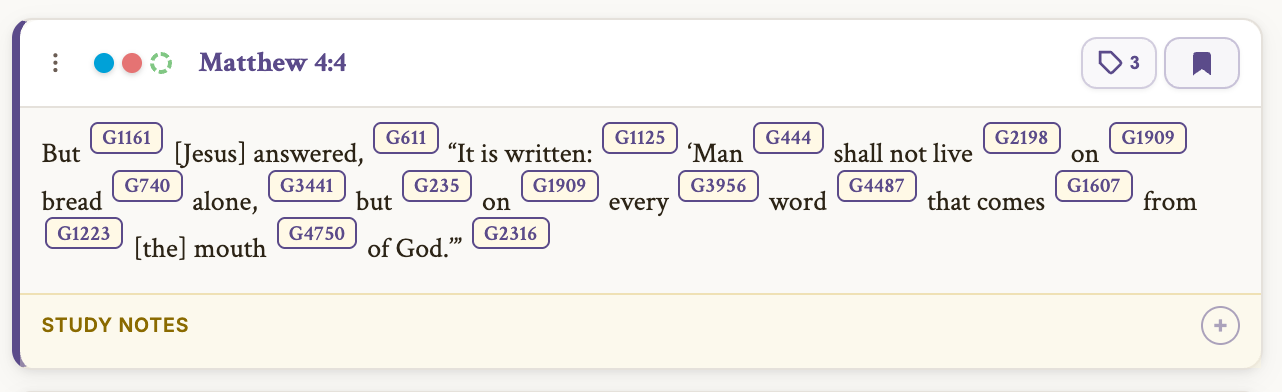
- Row 1 — Bible dots (solid) — Filled circles in each tag's color
- Row 1 — Study dots (dashed) — Open rings with dashed borders in each tag's color
- Row 2 — Word dots ("W") — Small circles with a "W" inside, shown below the verse when any Strong's number in that verse has a Word tag
Each layer can be independently shown or hidden in Settings.
Tags Sidebar Panel
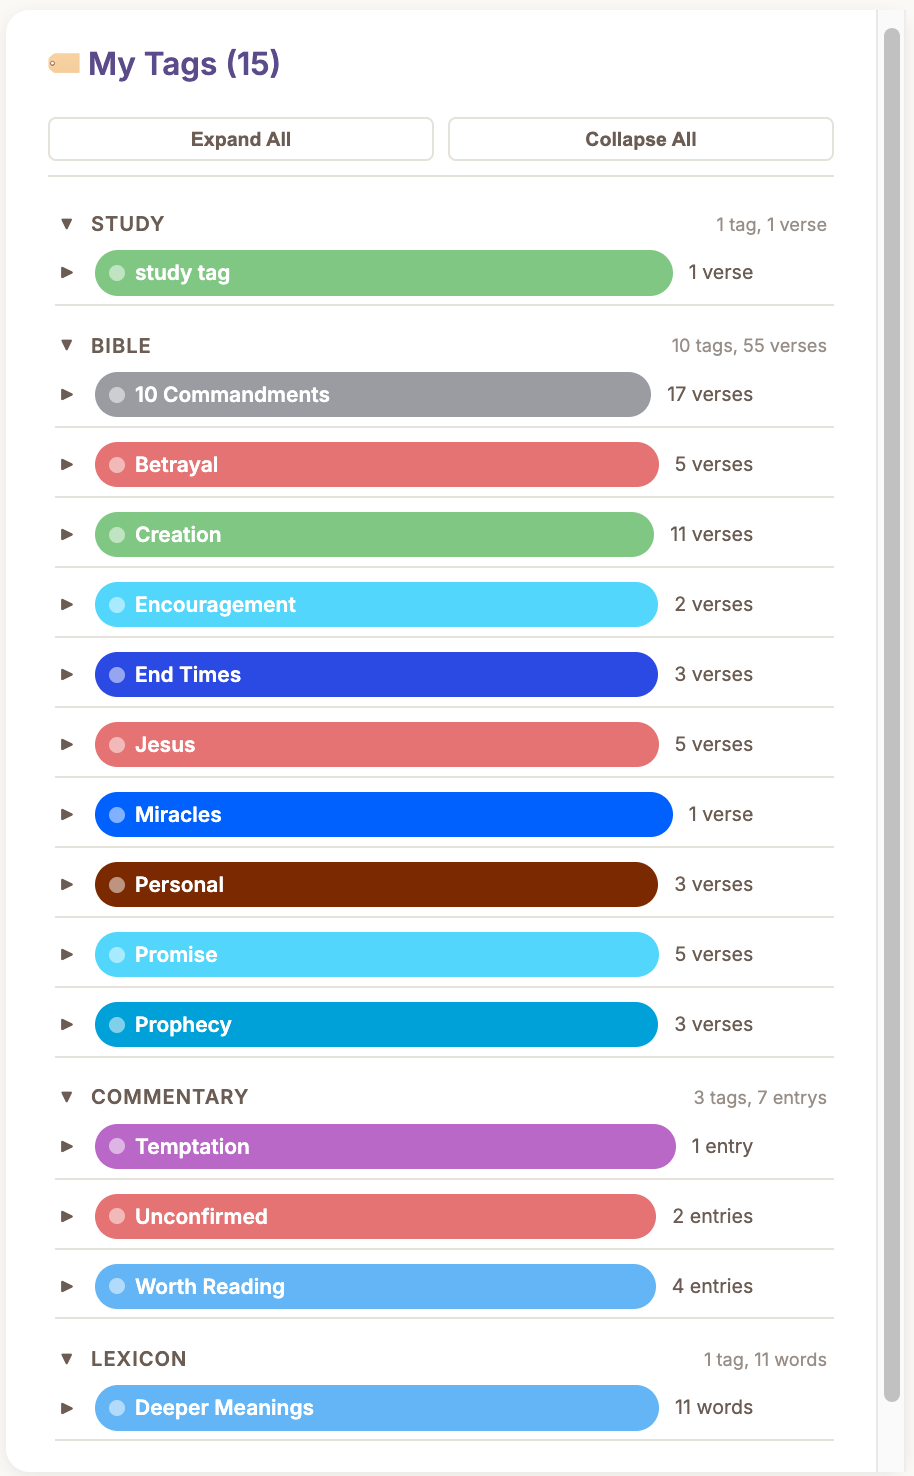
Click the Tags button on the nav rail to browse all your tags, organized in three collapsible sections:
- Study — Tags from the active study (verse references). This section is hidden when study mode is off, since no study is active.
- Bible — Permanent Bible tags (verse references)
- Lexicon — Word tags (Strong's number references with lemma and transliteration)
- Click any section header to collapse or expand it
- Click any tag group header to expand/collapse its list of assigned items
- Use Expand All / Collapse All buttons to toggle everything at once
- Click a verse reference to navigate to it (Bible) or open the Study Console (Study)
- Click a word reference to open the Lexicon Study Center with that word
- Use the × button on a tag group to delete the tag entirely (with confirmation)
- Use the × button on an individual item to unassign that tag from that verse/word (with confirmation)
Study Console
🔑 Free account required — studies save to your account (free accounts keep 5 active + 5 archived; Supporters unlimited)
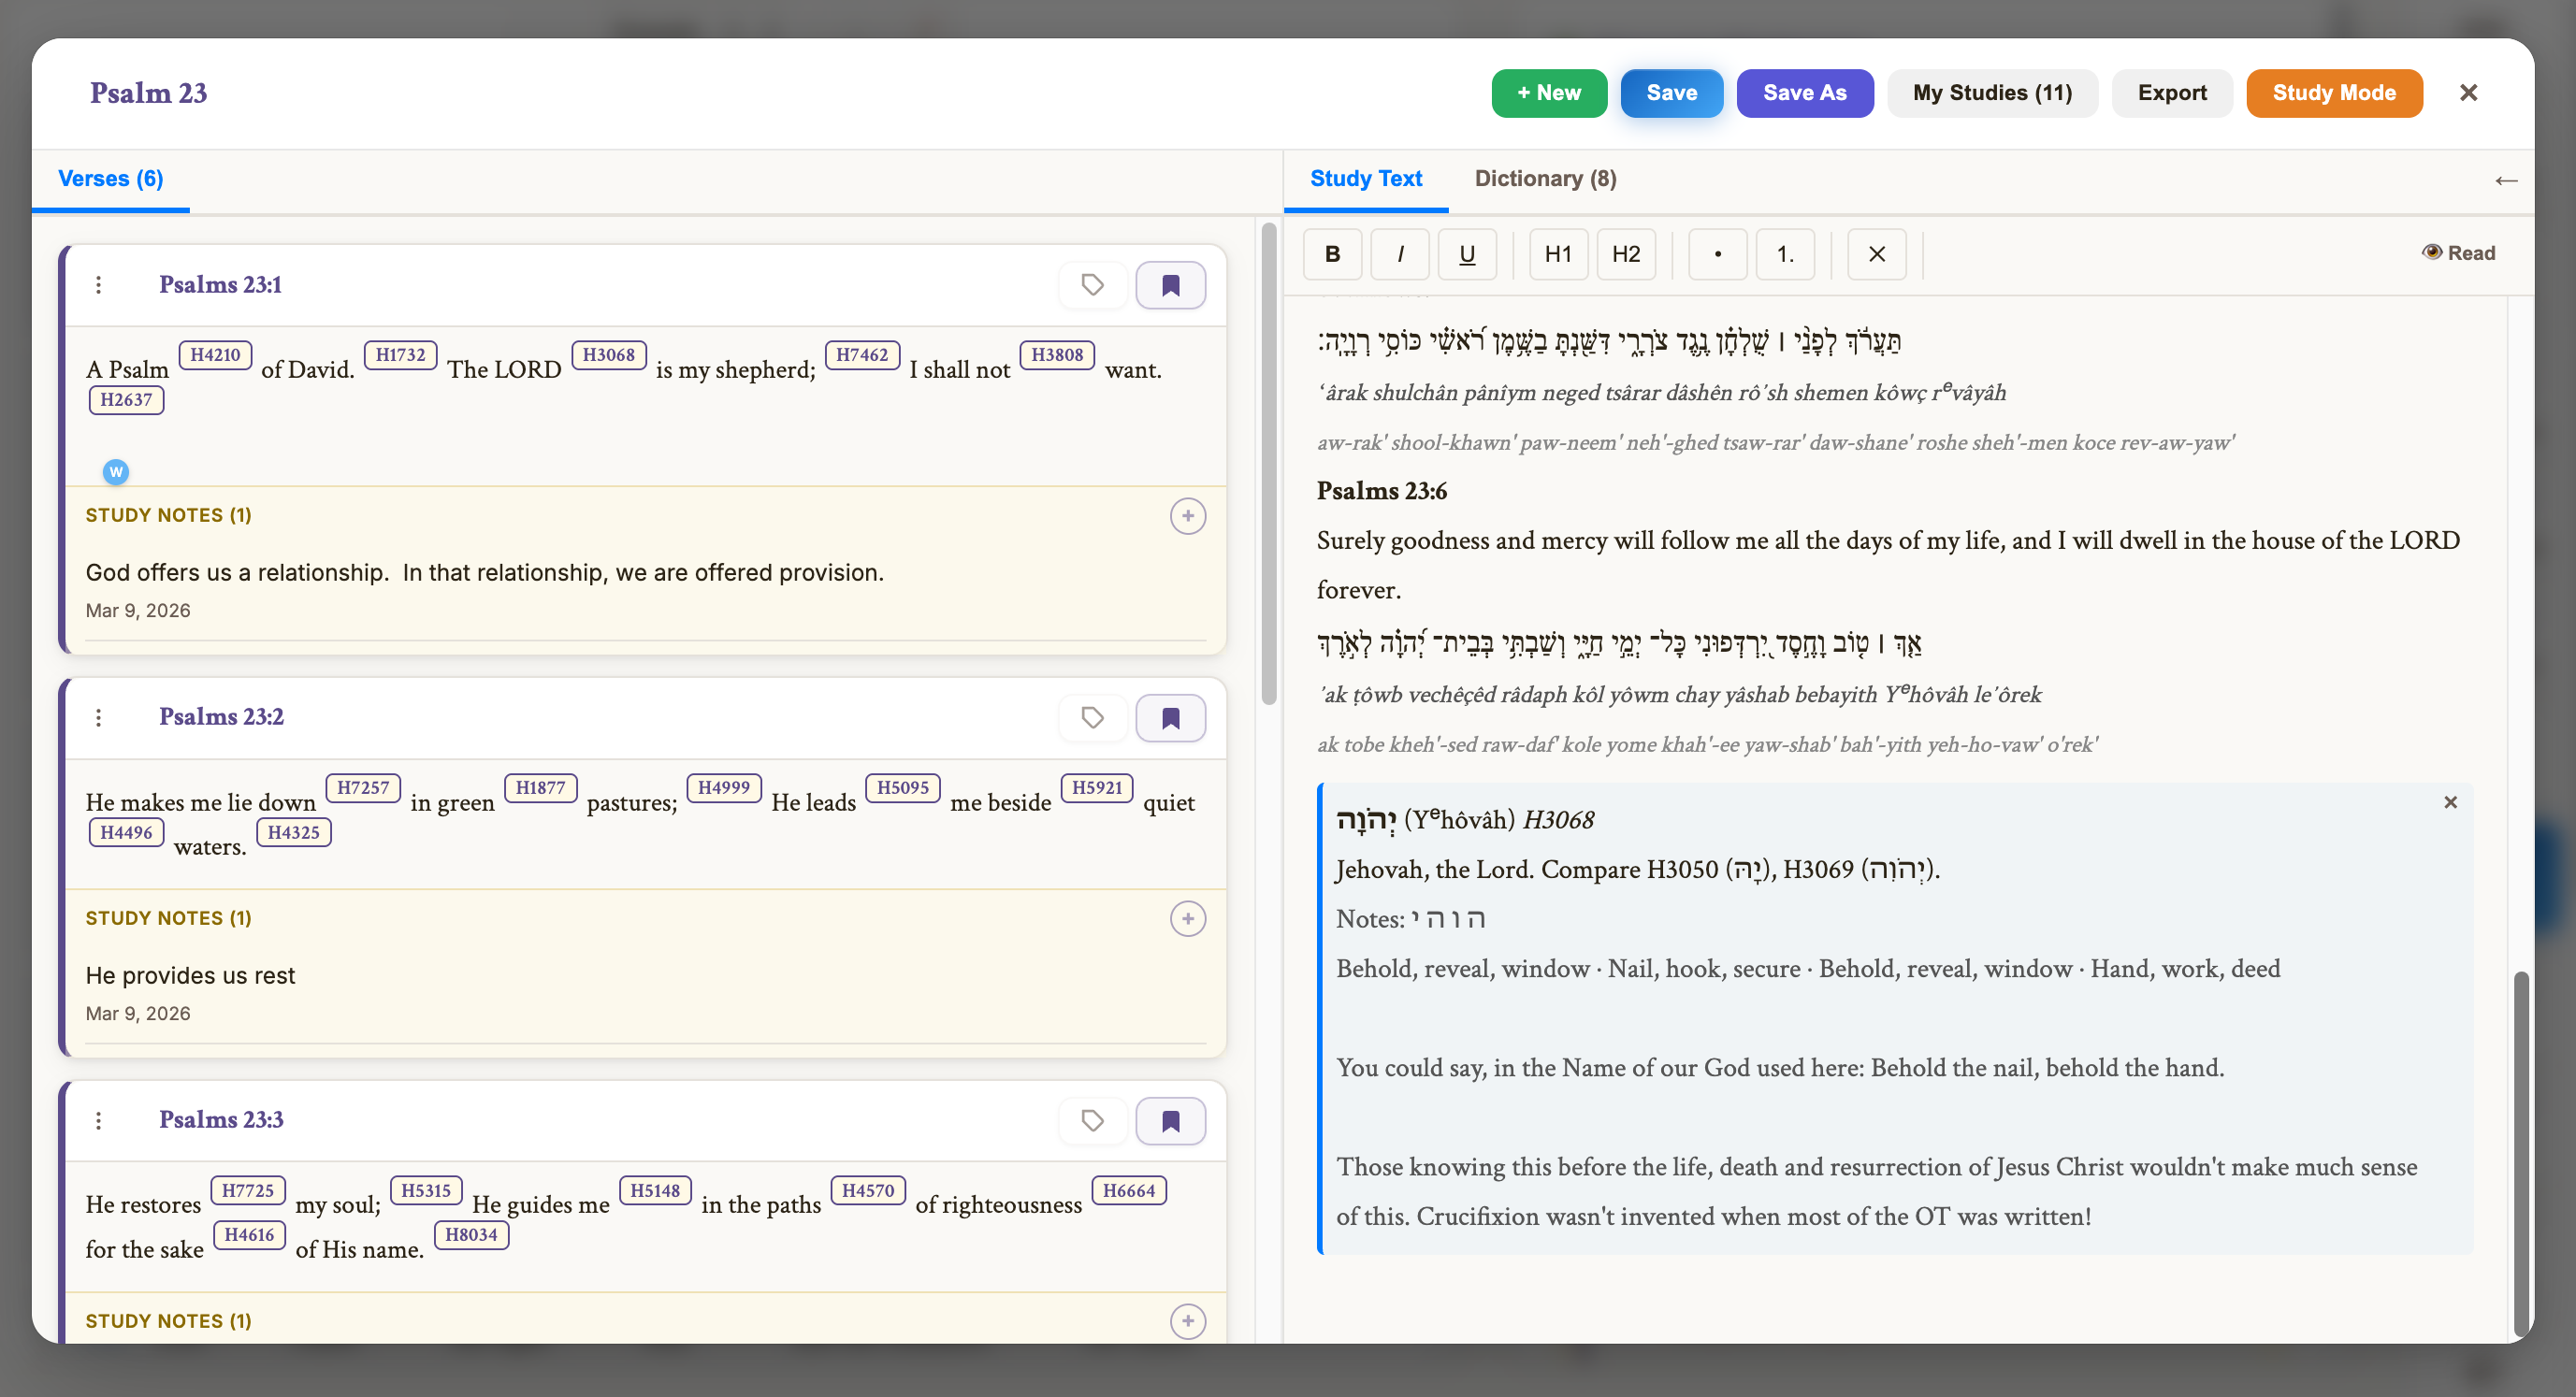
The Study Console is a full-screen workspace for preparing Bible studies. It provides a two-panel layout where you can write study text alongside your collected Bible verses, with full Strong's concordance access.
Creating & Managing Studies
Starting a New Study
There are several natural ways to begin a study:
- Bookmark a verse with study mode off — You'll be prompted to name a new study. Once you give it a name, study mode turns on, the study is created, and the bookmark is added. This works from any of the three bookmark entry points (verse card, verse trail, Bookmark All). See Study Mode.
- Click Save on the nav rail — If no study is active, you'll be prompted to name it. Everything you've been collecting (bookmarks, dictionary words, search results) is captured into the new study.
- Open the Study Console and create one — Click the Study button on the nav rail to open the Study Console, then start a new study from there.
Saving Your Work
Studies save automatically as you work. Any change — adding a verse, writing a note, editing study text — queues a save that goes to the cloud within moments. The Save button on the nav rail provides visual feedback:
- Red = unsaved changes are pending
- Blue = all changes saved
- Green flash = save just completed
You can also click the Save button at any time to force an immediate save. If you switch tabs or close the browser, any pending changes are flushed automatically — nothing is lost.
Duplicating & Exporting
- Save As — from the Save menu, duplicate the current study under a new name, creating an independent copy
- Rename — edit the study name in the header, or inline in Manage Studies
- Export — download the study as a plain-text file, including the study text, every verse with its notes, and your word list
Loading a Saved Study
Click the Study button on the nav rail to open the Study Console, which shows all your saved studies sorted by most recent. Click a study name to load it. All of its data — verses, notes, dictionary words, text, tags, search results, and verse trail — is restored exactly as you left it.
Your most recent study is automatically restored when you sign in, so you pick up right where you left off.
Deleting a Study
In the Study Console, click the delete button next to a study name. The study and all its data are permanently removed. If that study was the one you had active, you're returned to a clean slate.
- Study text (the rich-text editor content)
- All content cards — verses, commentary, Library passages, book/chapter intros, and ISBE articles
- Study notes (per-card notes inside the Study Console)
- The study's word list (dictionary)
- Verse trail
- Search results
- Study tag assignments (which verses have which study tags)
The Study Console Header
At the top of the Study Console you'll find the study name and a set of controls:
- Study name — Shows the name of the currently loaded study
- Study Mode button (orange) — Click to turn study mode off. If you have unsaved changes, you'll be prompted to save first. See Study Mode.
Study Text & Notes
The study text editor is a full rich-text editor. A toolbar gives you bold, italic, and underline, two heading levels, and bullet and numbered lists, plus a button to clear formatting. Toggle between Edit and Read modes with the button in the corner, and your text saves automatically as you write.
Send to Study & Quote Blocks
You can pull content into your study text from anywhere in the app. Select text in a commentary, a Library passage, a book/chapter introduction, an ISBE article, or a word study, right-click, and choose Send to Study. It's inserted as a tidy quote block — the source name, the reference, and the words in quotes.
- Every content card also has a “→ Text” button that appends that card's text into the editor
- Quote blocks can be dragged between your paragraphs to place them exactly where they belong — a drop-line shows where they'll land
- Each block has a remove (×) button
Study notes are per-verse notes written inside the Study Console — they are part of the study and are shared when you post to the Community Portal. This is different from Bible notes ("My Notes"), which are permanent, private, and never shared. (See Notes for the full distinction.)
Manage Studies & Archiving
🔑 Free account required
As your studies grow in number, the Manage Studies workspace keeps them organized. Archive the studies you're finished with to keep your active list focused — nothing is ever deleted unless you choose to delete it.
For free accounts, archiving is also how you rotate within the study limit: 5 active + 5 archived. Archive a finished study to open a slot for a new one, and bring it back any time a slot is free. Supporters have no limits in either column.
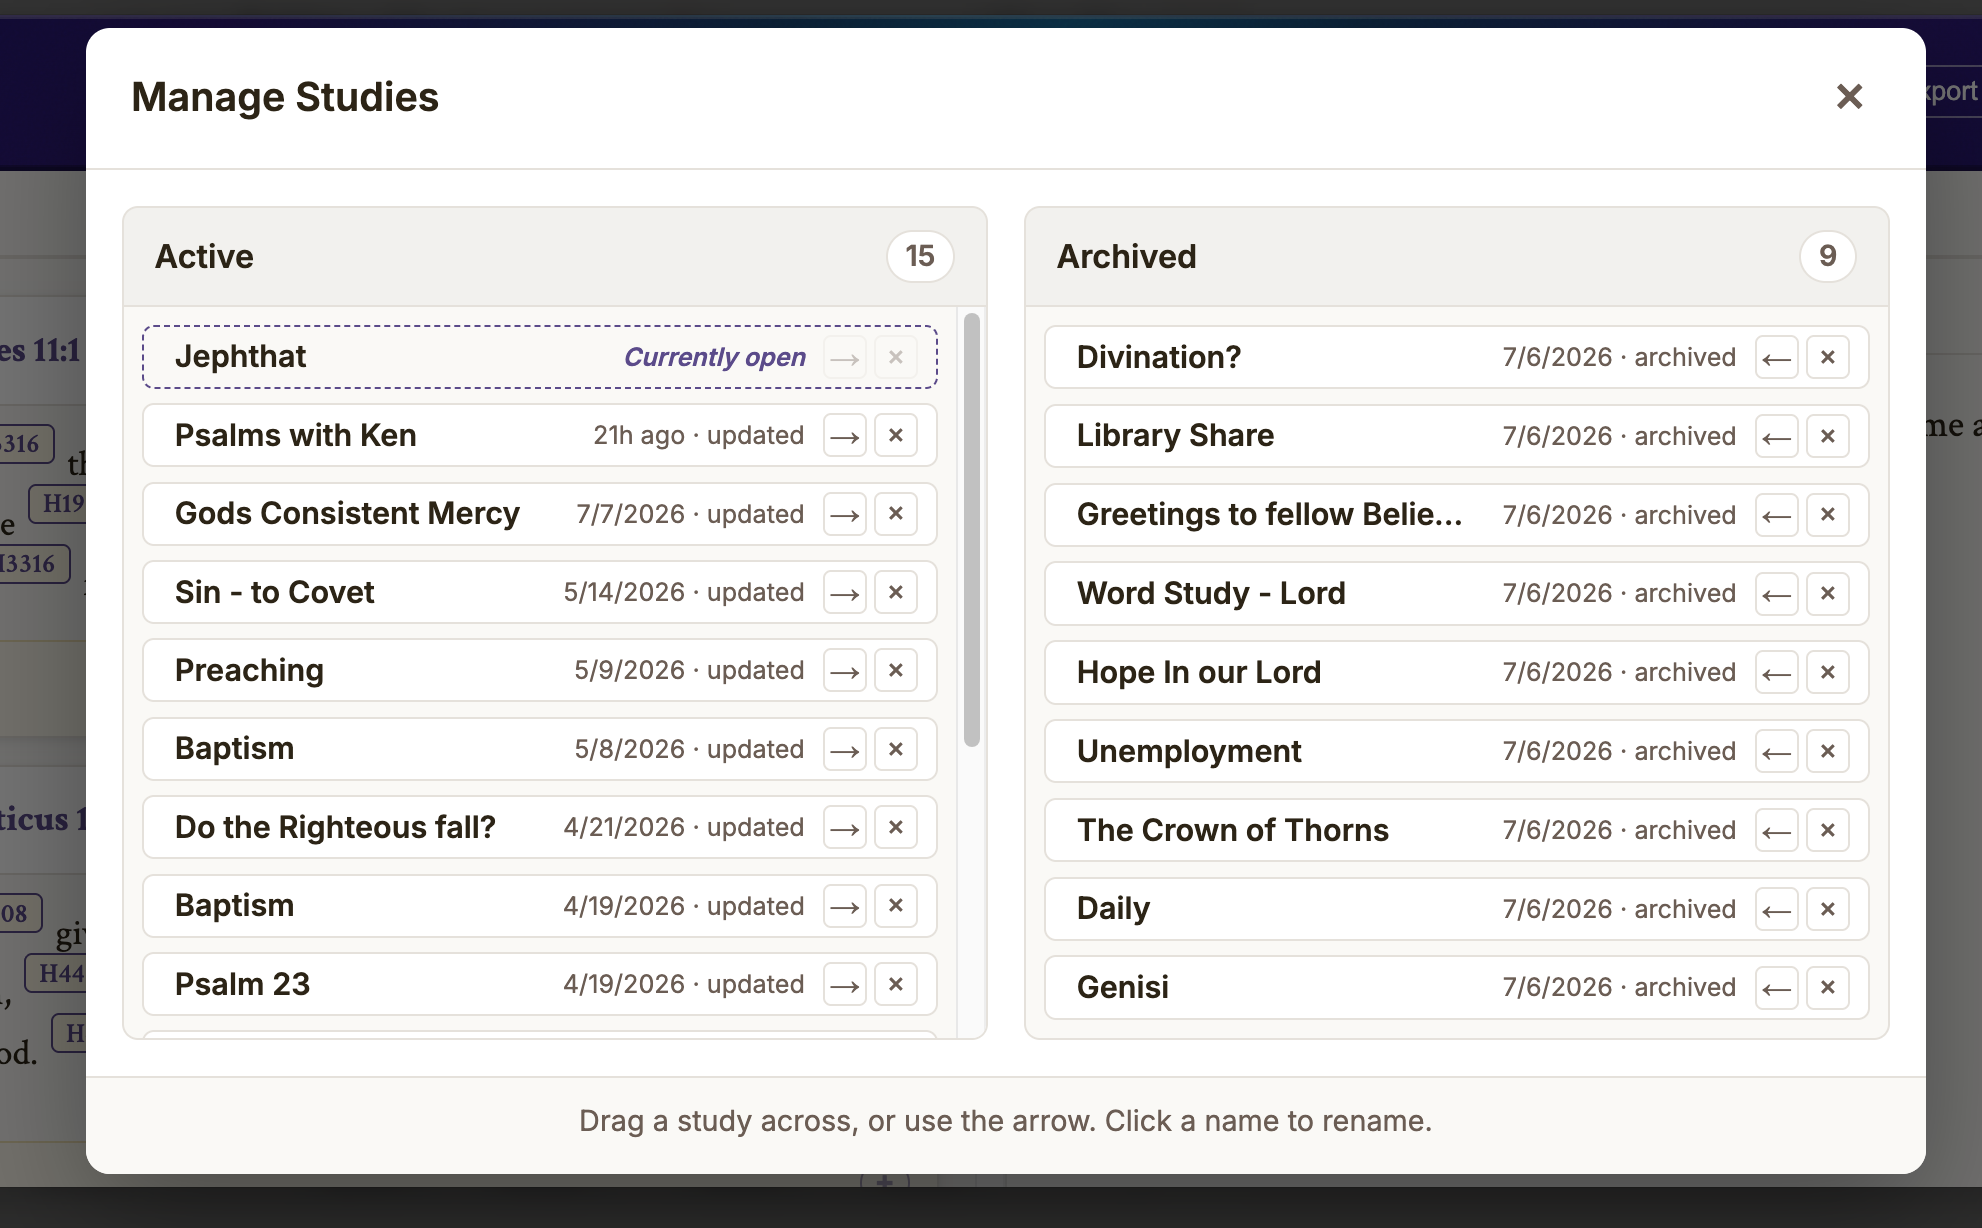
Opening Manage Studies
Two ways in, both opening the same workspace:
- From the Studies picker in the Study Console — click Manage Studies in the footer
- From Settings → Studies → Manage Studies
Two Columns: Active and Archived
The workspace shows your studies in two columns — Active on one side, Archived on the other — each with a live count.
- Archive or restore by dragging — drag a study from one column to the other. On touch devices, use the arrow button on each row.
- Rename inline — click a study's name to edit it; Enter saves, Escape cancels.
- Delete — remove a study for good, with a confirmation step.
- The study you currently have open cannot be archived until you close or switch away from it — this protects your active work.
Archived studies are hidden from the everyday Studies picker and from the community study-sharing list, but all of their content is preserved exactly. Drag one back to Active any time to pick it up again.
Lexicon Study Center
🔓 Browsing is open to everyone — My Words, collections, tags, notes, and Send to Study need a free account.
The Lexicon Study Center is a full-screen modal for deep lexicographic research. It contains over 13,000 Hebrew and Greek entries from Strong's Concordance, the Brown-Driver-Briggs Hebrew Lexicon, and the Abbott-Smith Greek Lexicon.
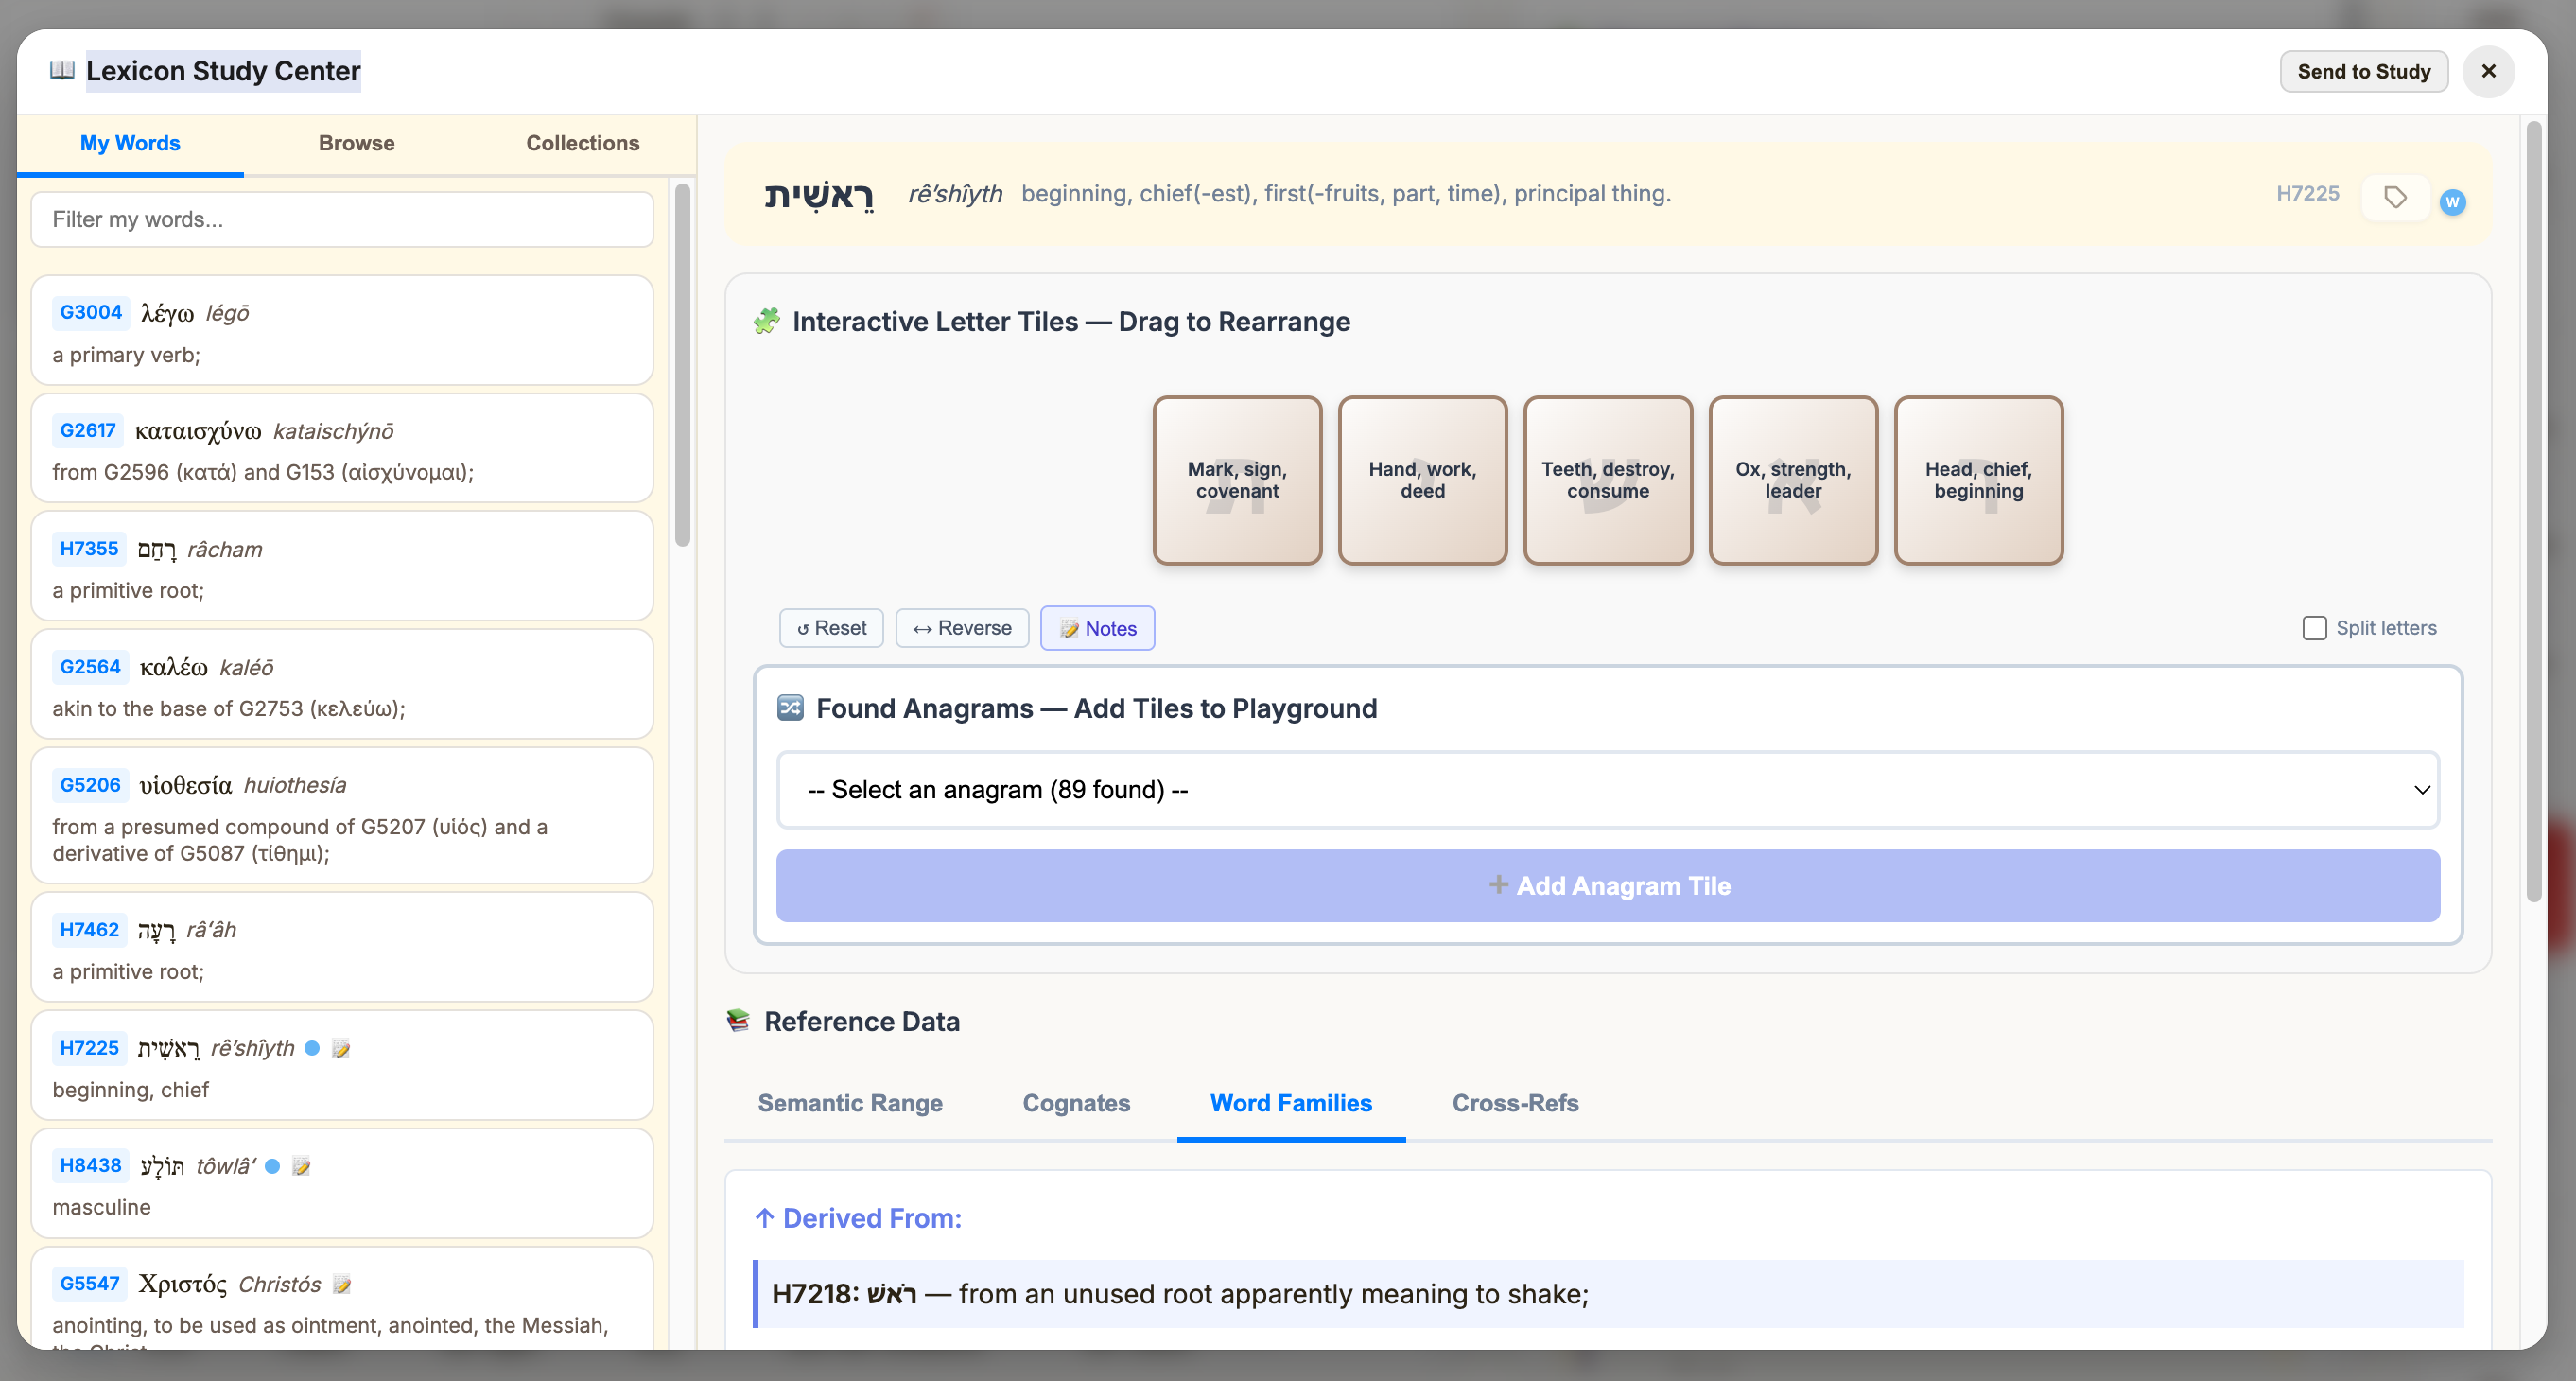
Open it from the Lexicons button on the nav rail, or press Ctrl+Shift+L.
The left panel has three tabs:
My Words
An aggregated list of every word you've studied or interacted with, sorted by most recent. A word appears here when you do any of the following:
- Click a Strong's number in the Bible text
- Tag a word with a Word Tag
- Write study notes on a word
- Send a word to your study
Each card shows:
- Strong's number, lemma, transliteration, and short definition
- Tag dots (if the word has Word tags)
- A note icon if you've written notes on this word
- A filter/search bar to quickly find a specific word
Browse
Browse the complete Hebrew or Greek lexicon with paginated results:
- Toggle between Hebrew and Greek with language buttons showing entry counts
- Search by Strong's number, lemma, transliteration, or definition
- "Load More" pagination for smooth browsing of the full lexicon
Collections
Collections show your Word Tag groups. Every tag that has words assigned appears as a collection card, sorted by item count.
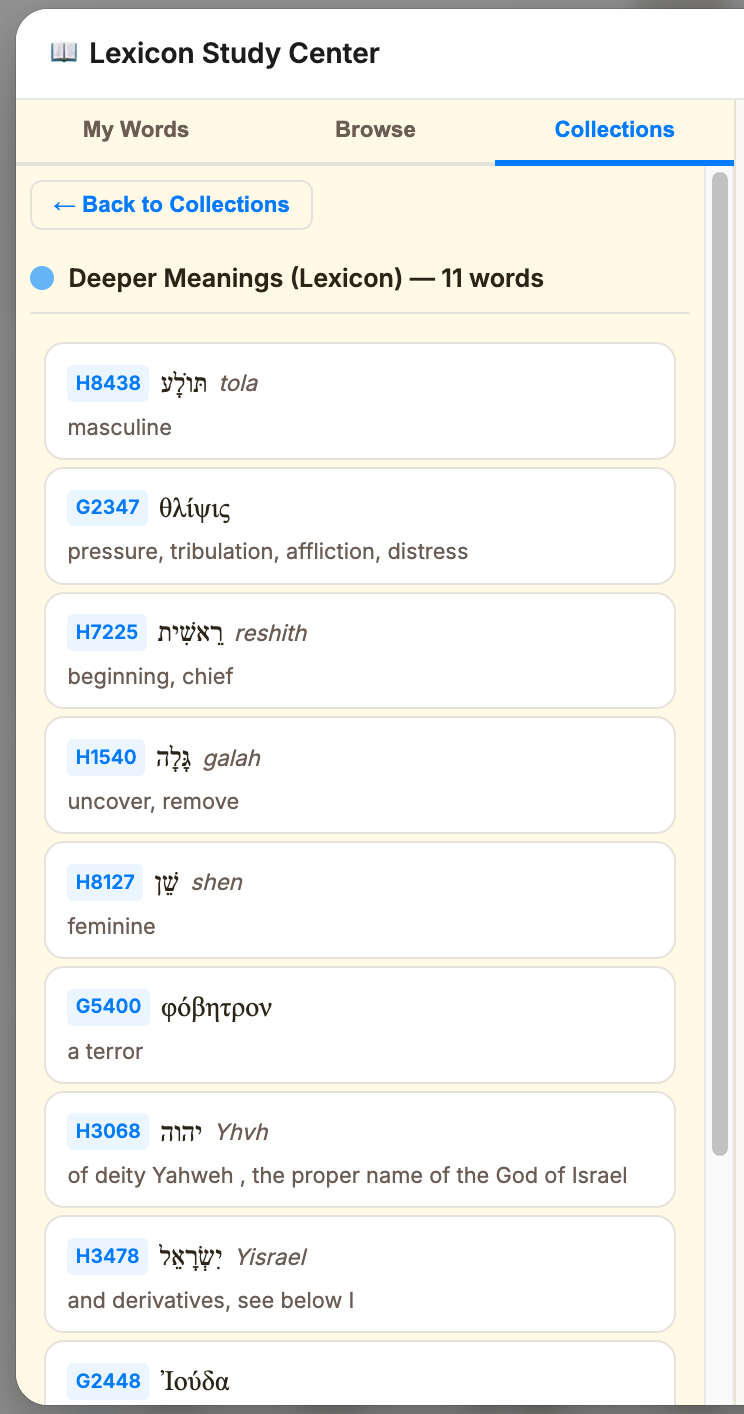
- Each card shows the tag color, name, and word count
- Click a card to drill into its words
- Click a word in the collection to load its full study in the right panel
- Use the back button to return to the collections list
The right panel shows the Word Study Panel for whichever word you've selected. This includes:
- Full word display (lemma, transliteration, meaning, Strong's number)
- Word tag button and tag dots
- Interactive letter tiles with drag-to-rearrange and anagram discovery
- Reference tabs: Semantic Range, Cognates, Word Families, Cross-References
- Auto-saving study notes
- Send to Study button — injects a formatted word study block into your active study
Deep Word Studies
🔑 Free account required — word studies save to your account
Word Studies let you save extended research on individual Strong's words. Each study captures the word, its context, and your personal notes.
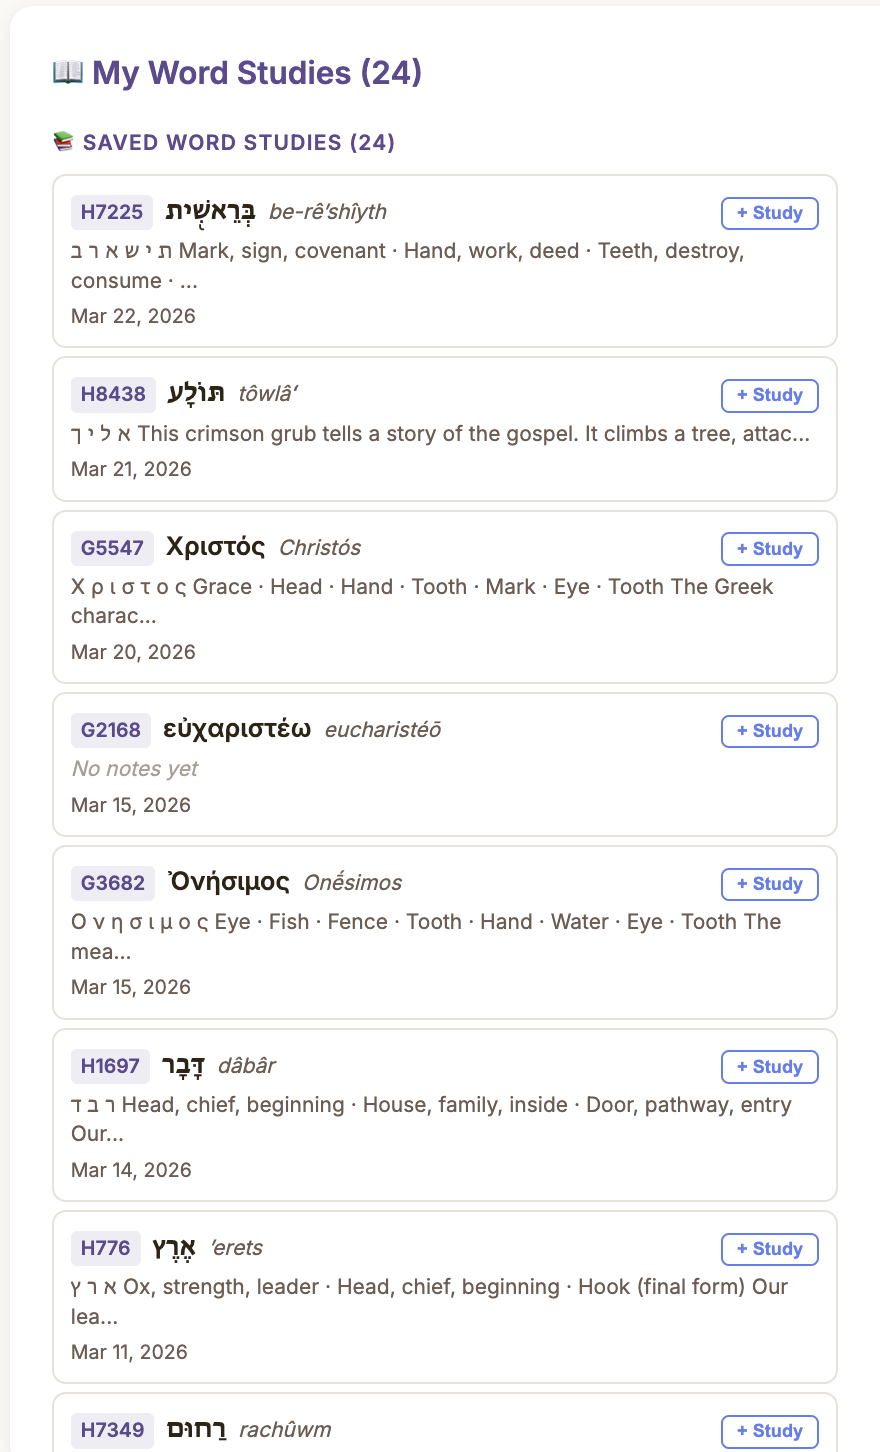
- Click the Word Study button in the Strong's sidebar view to create or open a study for that word
- Write and auto-save personal notes about the word
- Studies are permanent — they persist forever across all your studies and devices
- From the Word Studies sidebar, click to inject a formatted word study block directly into your study text
- Click any study in the list to open the Lexicon Study Center for deeper research
Original Language Practice
🔓 Open to everyone — sending a verse to a study needs a free account.
The Language Practice modal helps you practice reading the current chapter in its original Hebrew or Greek. It displays the original-language text alongside transliteration and English translation to help you learn to read the languages of the Bible.
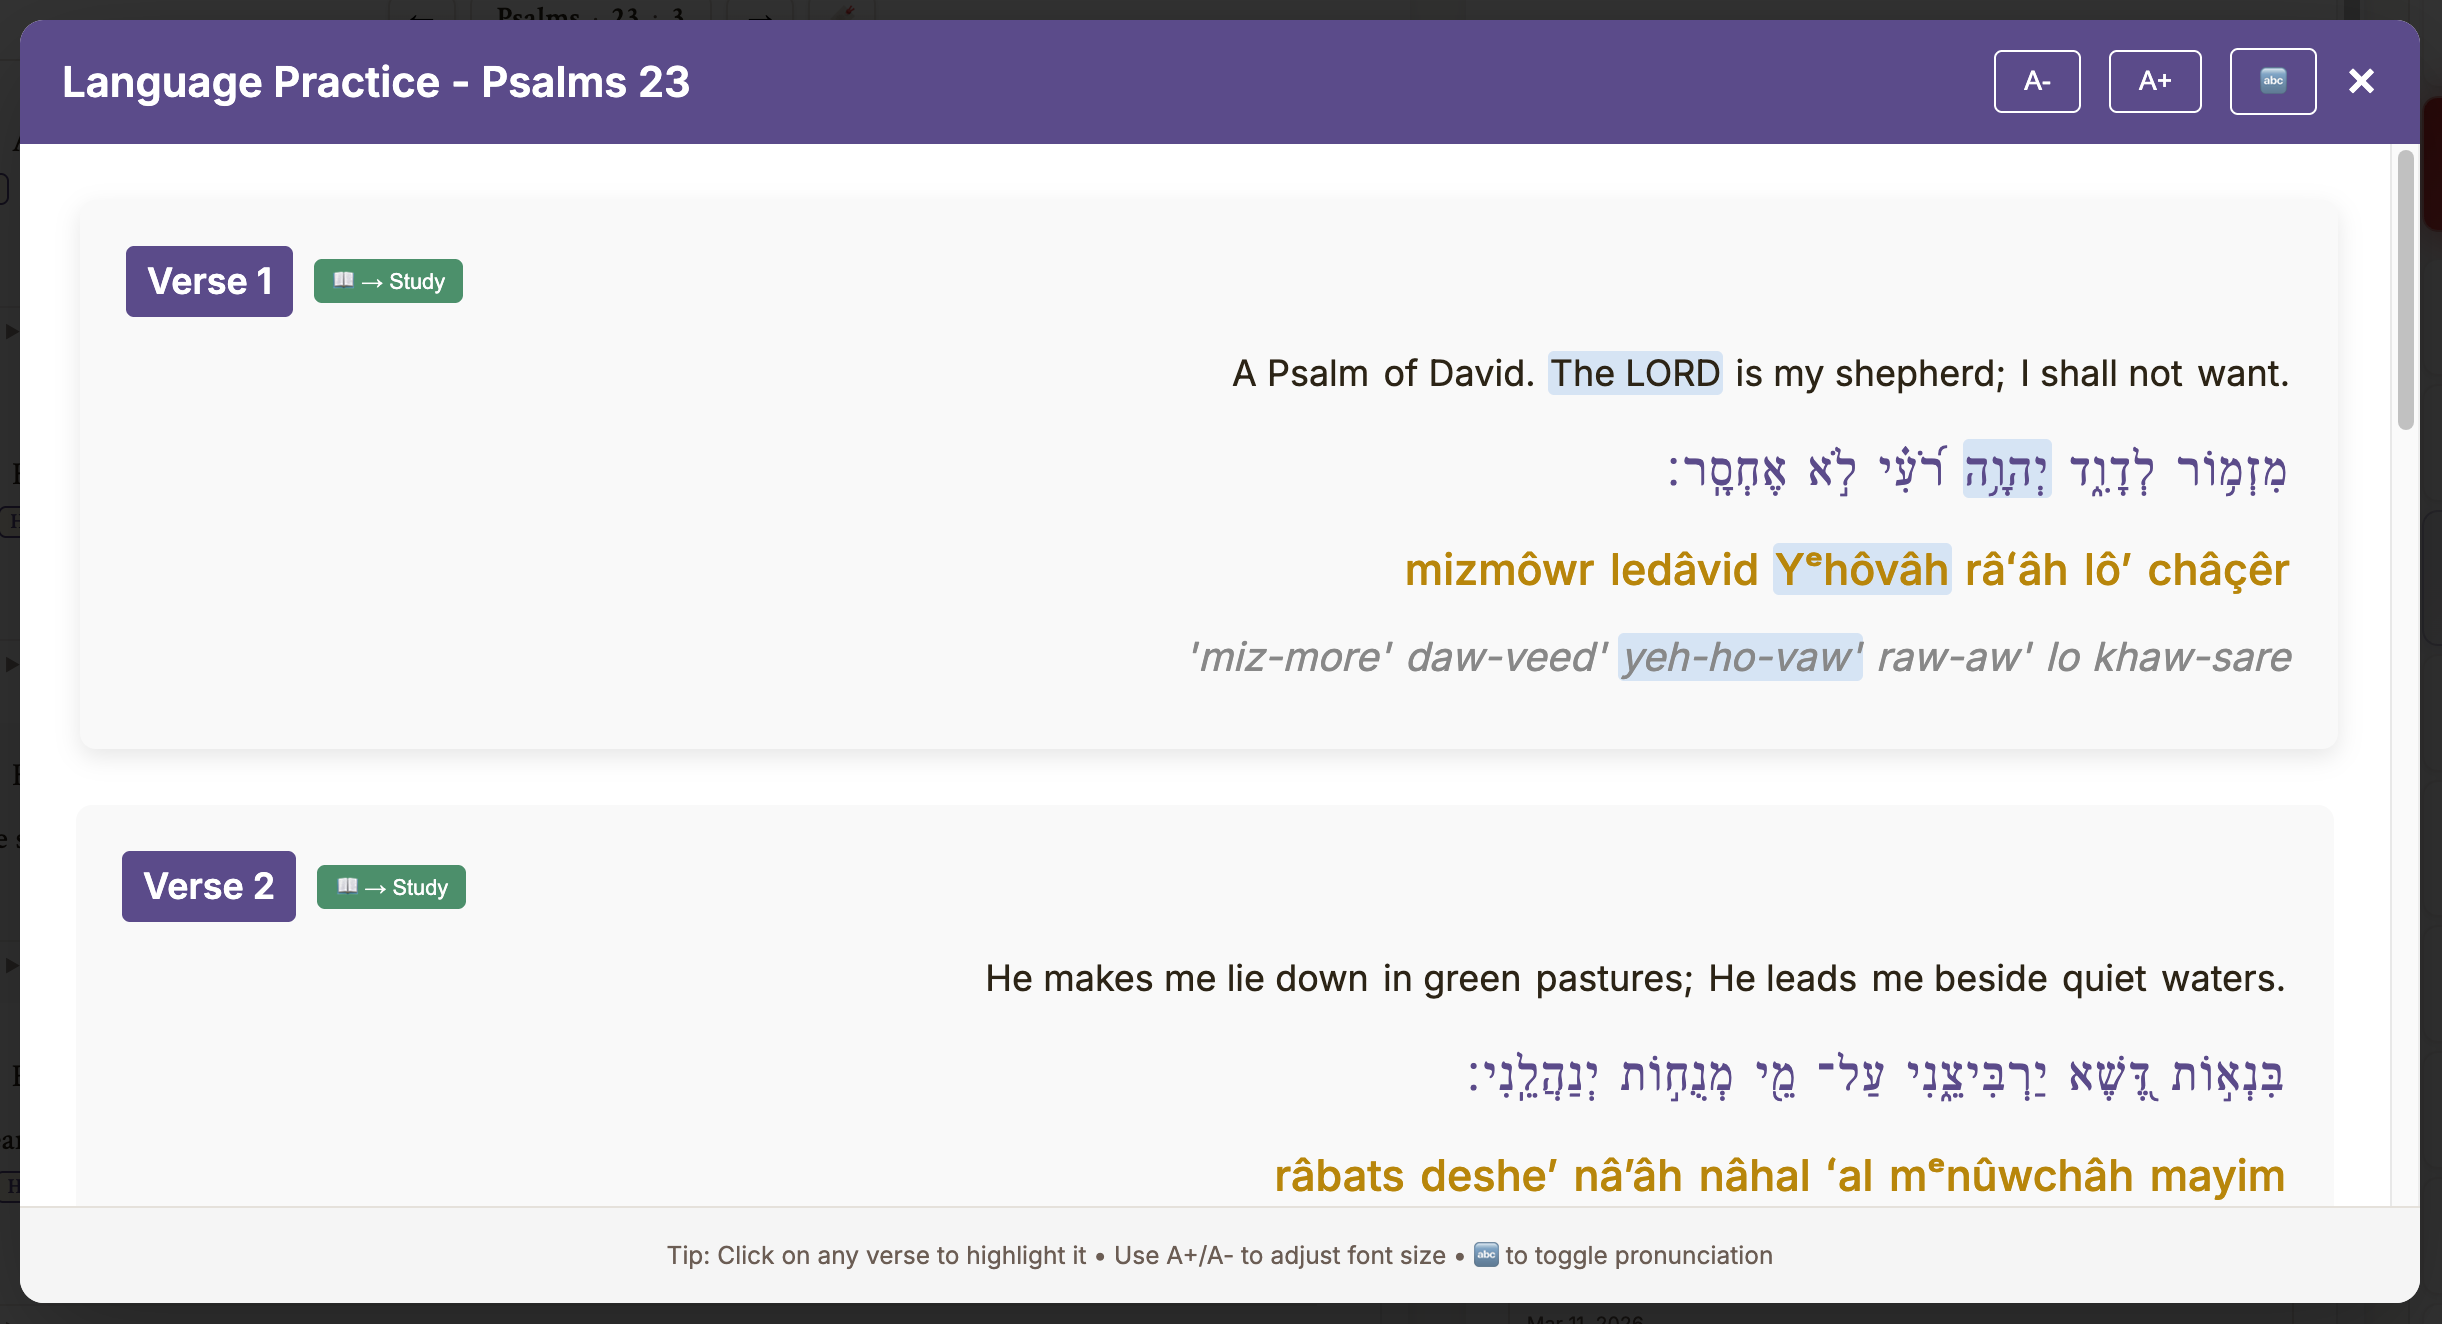
- Open from the Language Practice button on the navigation rail — it loads the current chapter automatically
- Each verse is stacked for you: the English, the original Hebrew or Greek, and the pronunciation. For Hebrew, a phonetic line helps you sound each word out.
- Hover a word in one row and the matching word lights up in the others, so you can see exactly which word is which
- Adjust the text size, or toggle the pronunciation on and off as you grow more confident
- Use the → Study button to send a verse — with its original text and pronunciation — straight into your active study
Theology Library
🔓 Reading is open to everyone — bookmarks, tags, notes, highlights, and Send to Study need a free account.
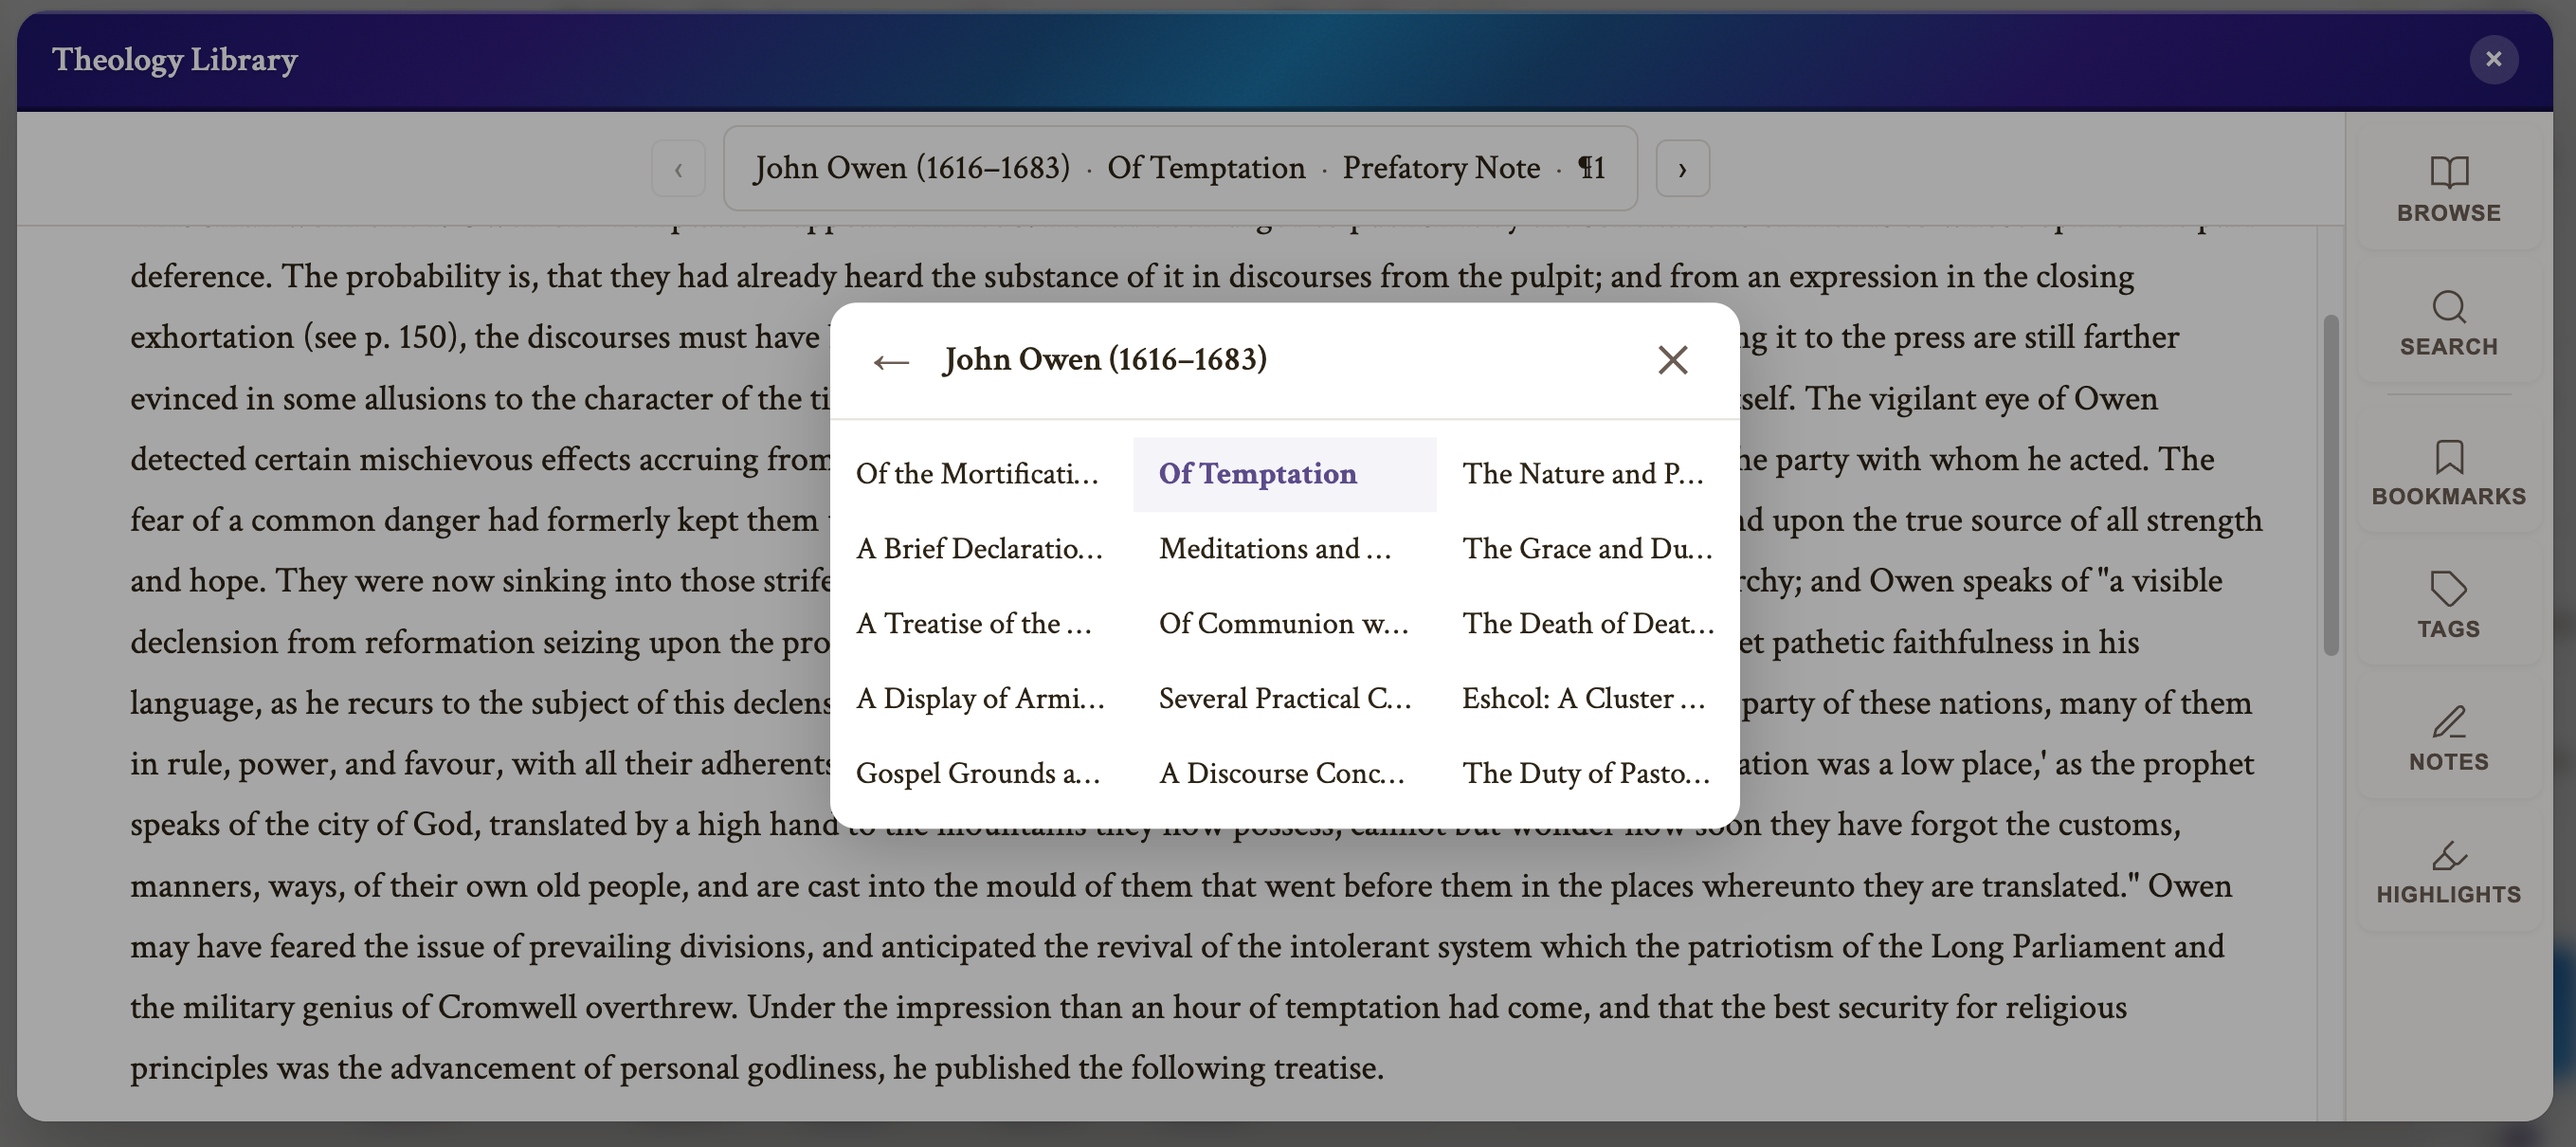
The Theology Library brings the great works of Christian history into your study — 40 complete works from 16 authors, more than 2,300 chapters in all. Read them on their own, or weave their words directly into your studies.
Browsing the Library
Open the Library button on the navigation rail. On your first visit (or whenever you have no saved reading spot) the author picker opens automatically — choose an author, then a work, then a chapter to read. If you were reading something, the Library reopens right where you left off. A sample of what's included:
Augustine
Confessions • The City of God • On Christian Doctrine • Enchiridion
John Calvin
Institutes of the Christian Religion • On the Christian Life • Of Prayer
John Owen
15 works — Mortification of Sin, The Death of Death, The Glory of Christ, and more
Martin Luther
8 works — The Bondage of the Will, the Catechisms, Galatians, Table Talk
John Bunyan
The Pilgrim's Progress • The Holy War • Grace Abounding
and more
Aquinas, Andrew Murray, Chesterton, à Kempis, Watson, Pink, Ryle, Spurgeon, Anselm, Brother Lawrence, Torrey
Additional authors (Jonathan Edwards, Richard Baxter, the Early Church Fathers, and others) appear in the list greyed out and marked “coming soon” as we continue to add works.
Tools Inside the Library
The Library is a full study space of its own. Down the side you'll find the same tools you use elsewhere in the app:
- Browse & Search — move through works by author, or search across the Library
- Bookmarks — mark passages to return to
- Tags & Highlights — colour-code and mark up what you read
- Notes — write your own notes on any paragraph
Sending a Passage to Your Study
- Select a paragraph in any work, right-click, and choose Send to Study
- The passage drops into your active study as a Library card, complete with its citation (author, work, chapter, paragraph)
- Library cards can be tagged, annotated with study notes, and injected into your study text with the “→ Text” button
- Write personal notes on any paragraph using the Library notes dialog
ISBE Encyclopedia
🔓 Reading & search open to everyone — bookmarks, tags, notes, highlights, and Send to Study need a free account.
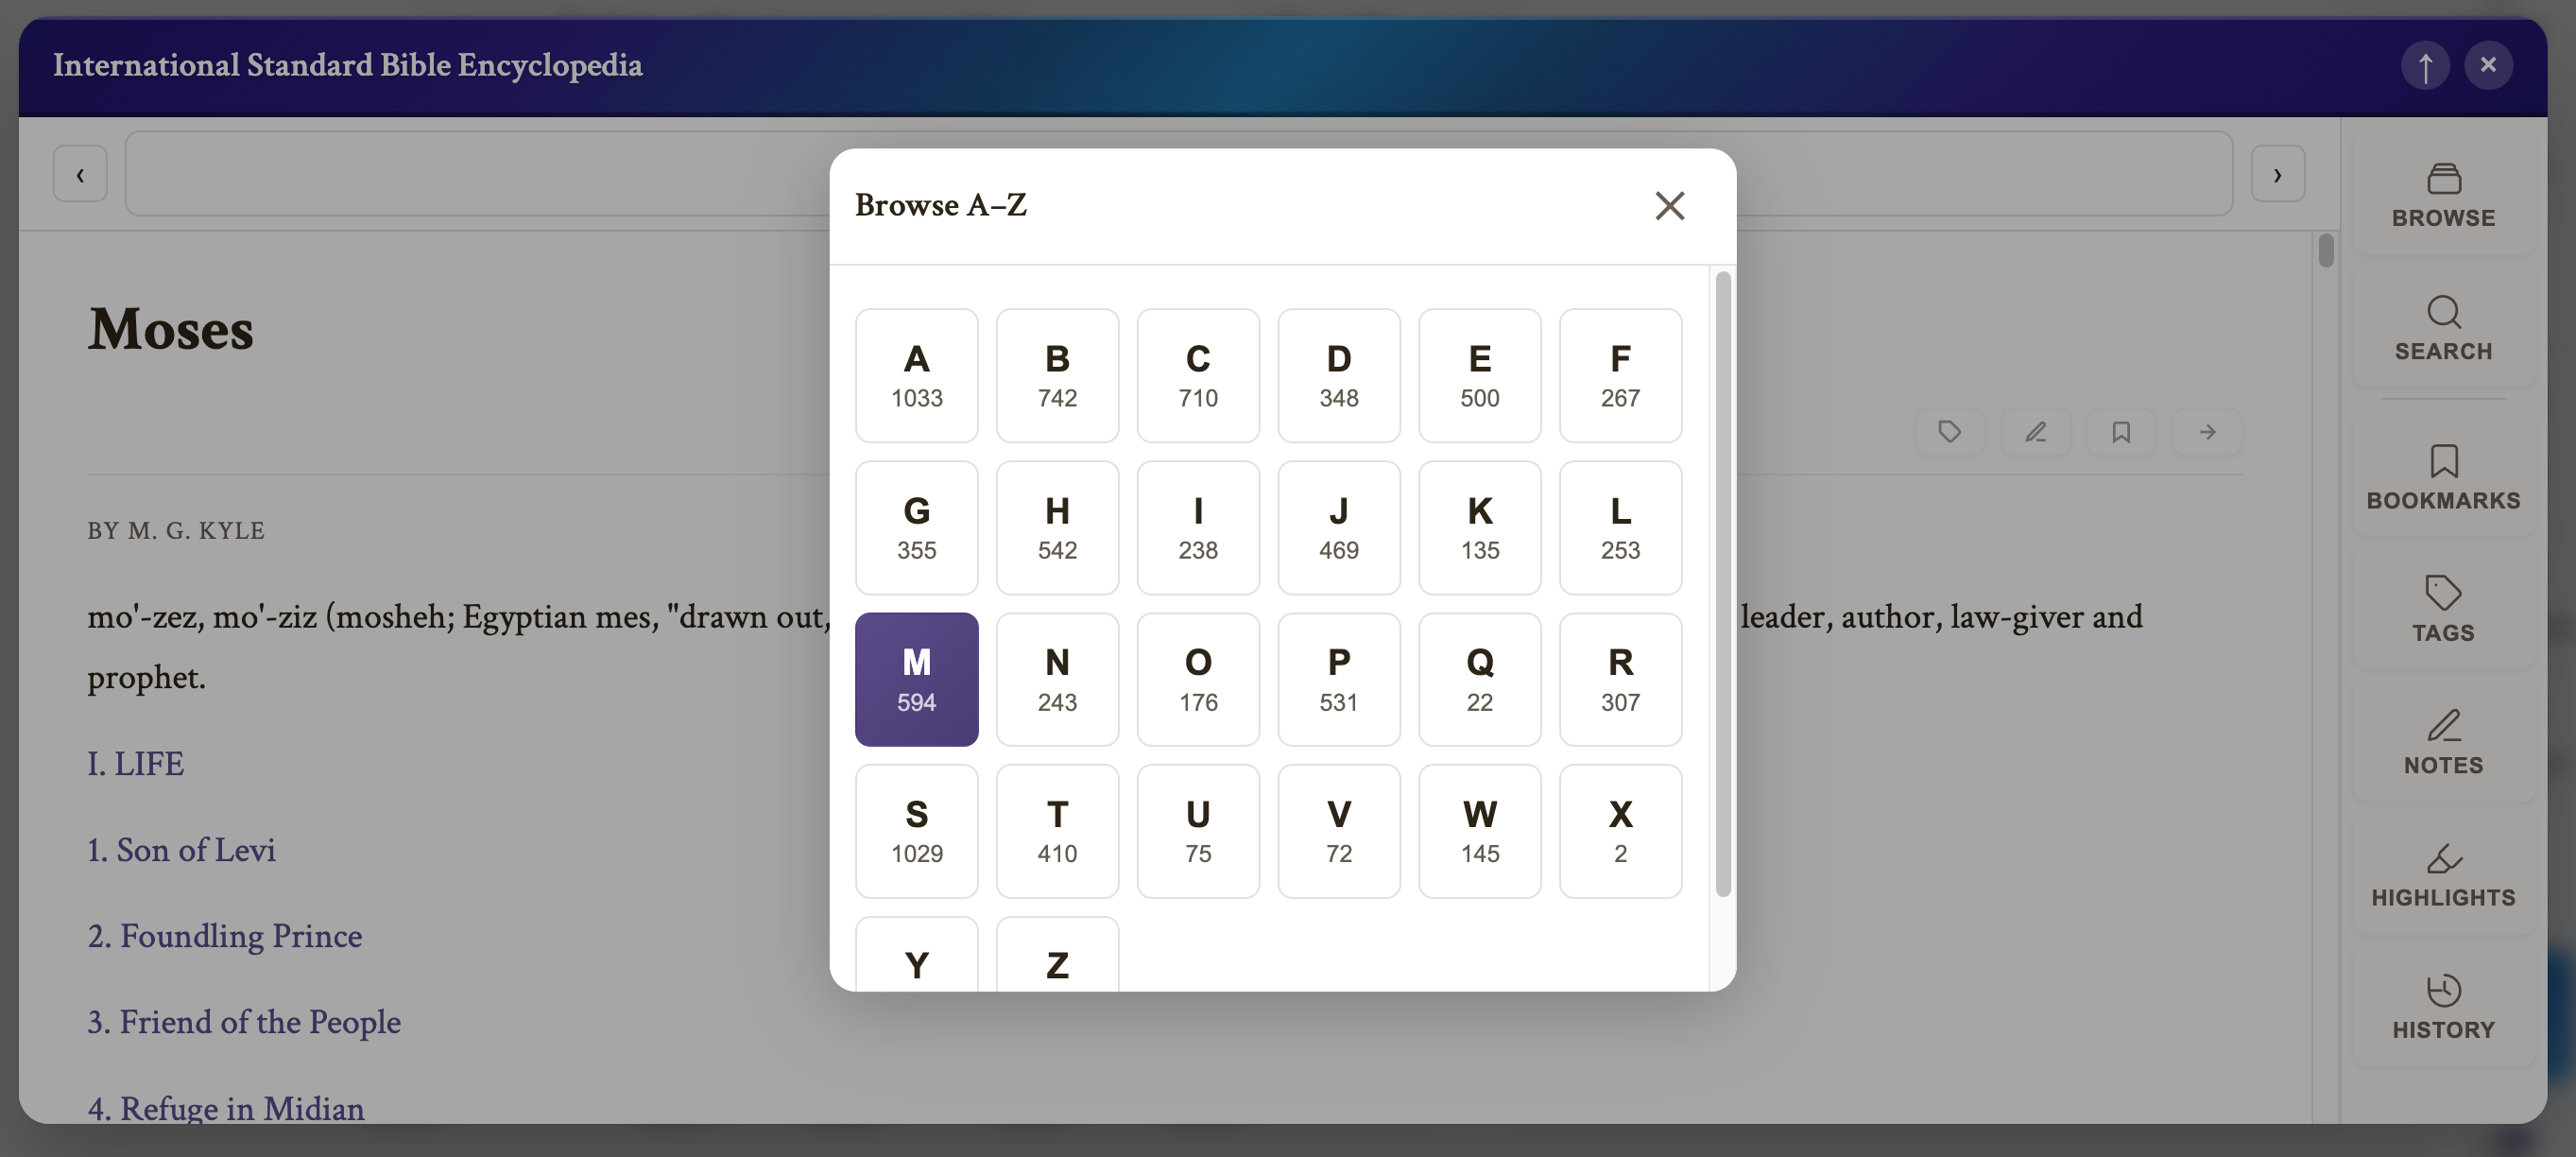
The International Standard Bible Encyclopedia (1915) is built right in — nearly 9,400 articles covering every person, place, doctrine, and custom in Scripture, from A to Z. It's the deepest reference layer in Scripture Toolkit.
Finding an Article
Open the ISBE button on the navigation rail. On your first visit (or whenever you have no last-read article) the A–Z browse picker opens automatically; otherwise the encyclopedia reopens to the article you last had open. From there you can:
- Search any topic — a person, a city, a doctrine, a word
- Browse A–Z — the complete 1915 encyclopedia, cover to cover
- Read the full article, with related articles and Scripture references cross-linked
Working With Articles
Every ISBE article supports the same study tools as the rest of the app:
- Tag, highlight, take notes, and bookmark articles
- Send to Study — add a whole article, or a selected excerpt, to your active study as an ISBE card
- Your place is remembered — reopen the ISBE and it returns to the last article you were reading
- History — the ISBE keeps a history of the articles you've visited, so you can retrace your steps
ISBE also supplies the book-level introductions in Book & Chapter Introductions and appears as a reference layer in the verse commentary panel.
Harmony of the Gospels
🔓 Reading open to everyone — tags, notes, bookmarks, and Send to Study need a free account.
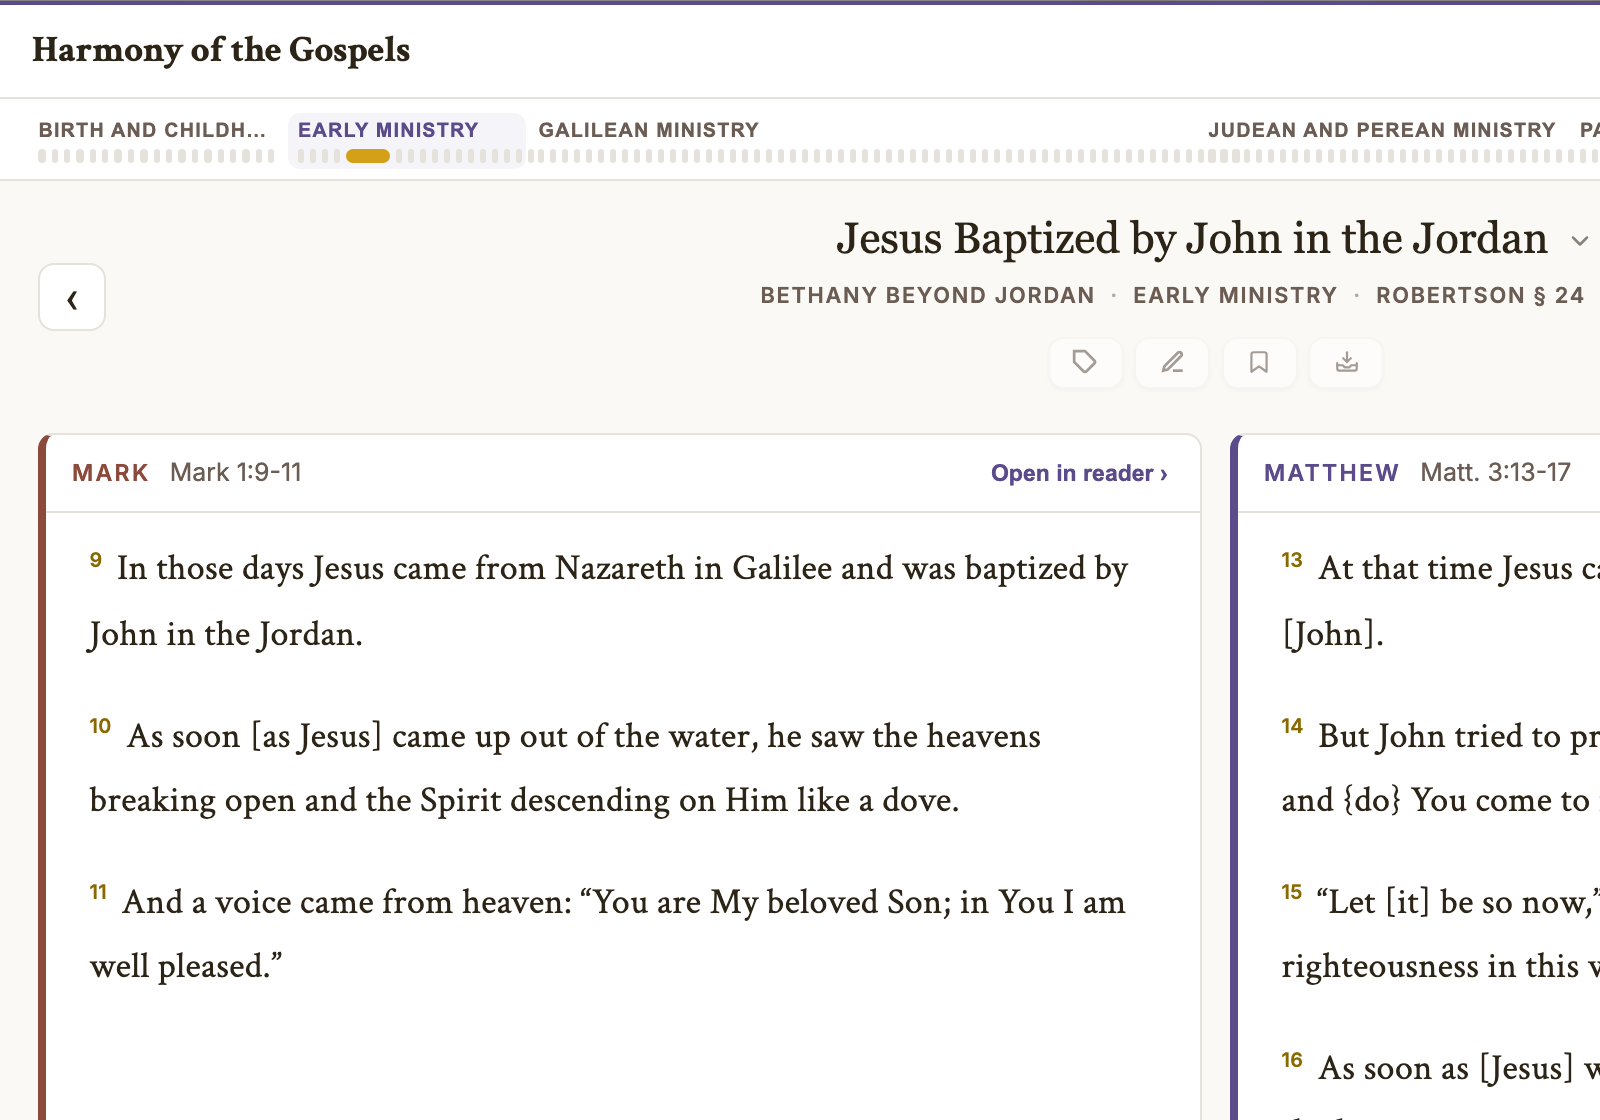
Four voices, one testimony. The Harmony lays the four Gospel accounts side by side, event by event, through the whole earthly life of our Lord — 185 events following A. T. Robertson's classic 1922 Harmony of the Gospels. Open it from the Harmony button on the navigation rail.
The Timeline Ribbon
Across the top, all 185 events appear as a ribbon of dots grouped into the periods of our Lord's life — from the birth narratives through the Passion and Resurrection. Click any dot to jump to that event, use the ← → steppers to walk event by event, or click a period name to open a picker listing every event in that period. Events you've tagged show their tag's color on the ribbon — the timeline becomes a topical map of your own study.
The Fourfold Witness
Each event shows all four Gospels: on desktop, side-by-side columns; on mobile, a swipeable deck with one witness at a time. Every passage is the full Scripture text in your current translation (original-language Old Testament texts fall back to English here, since the Gospels are New Testament). Where a Gospel doesn't record the event, its column says so honestly — and where Robertson notes a parallel outside the Gospels (Acts, 1 Corinthians), those references appear too. Robertson's own section notes appear beneath the witnesses.
Study Tools on Every Event
- Tag — Tag events just like verses; harmony tags share your Bible tag colors, appear on the timeline ribbon, and gather in the Tags sidebar under their own Harmony group.
- Note — Write private notes on any event.
- Bookmark — Flag events; bookmarked events show a flag in the period picker so you can find them again fast.
- Send to Study (tray icon) — Sends the whole event into your current study as a fourfold witness card: all four accounts condensed side by side, expandable to the full passages, with Robertson's note and a button that reopens the Harmony at that event. (See Study Console.)
The header carries the same Strong's and ISBE toggles as the reader — they're global, so what you set here follows you everywhere.
Bible Reference Popup
🔓 Open to everyone — its tag, note, and send-to-study buttons need a free account.
The Bible Reference Popup is a floating, draggable window that lets you read any verse without leaving your current view. It appears whenever you click a cross-reference link, a verse reference in the Tags panel, or a verse reference in the Lexicon Study Center collections.
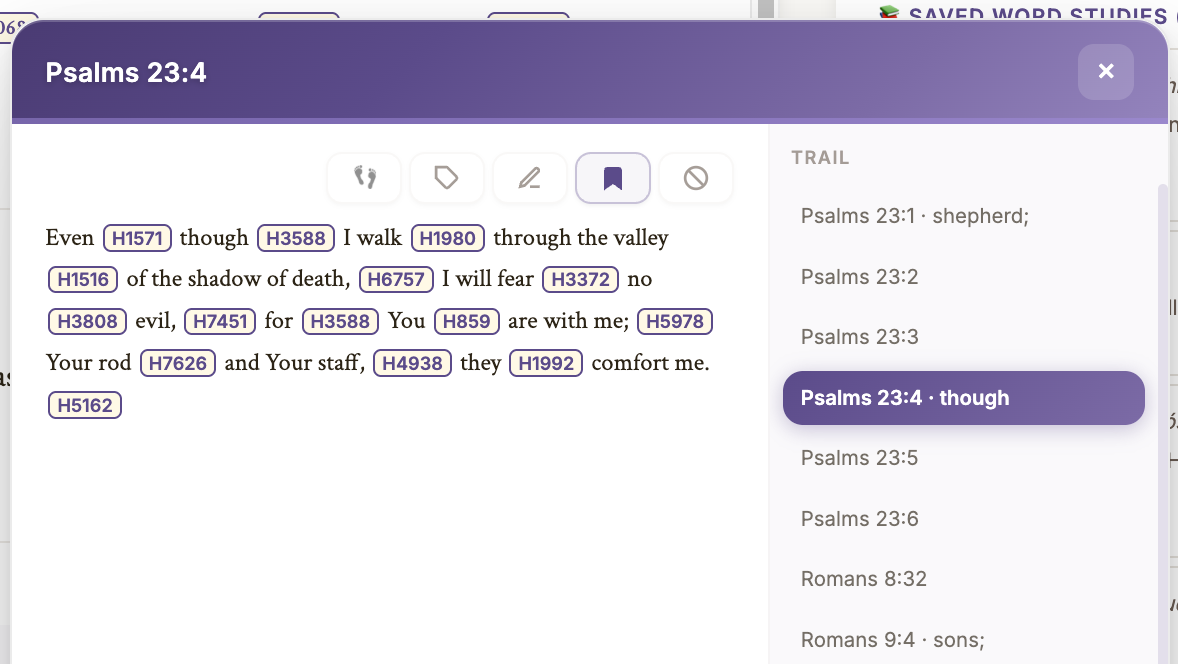
- Draggable — Grab the purple header bar to move the popup anywhere on screen
- Action buttons — Every verse in the popup has: "Go to verse" (navigate the main reader), Send to Study, Tag, and Notes buttons
- Navigation trail — When you follow cross-references within the popup, a trail builds on the right side showing every verse you've visited. Click any trail entry to jump back to it.
- Strong's numbers — Strong's markup is fully active inside the popup. Click any Strong's number to see its definition in the sidebar.
- On mobile, the popup appears as a bottom sheet that slides up from the bottom of the screen
- Press Escape to close the popup
Verse Trail
🔓 Open to everyone for the visit — a free account is what makes the trail still be there tomorrow.
The Verse Trail tracks every verse you visit as you follow cross-references, click bookmarks, click Strong's words, or explore related passages. It builds a breadcrumb trail of your research journey — a record of where the Spirit has led you through the Word.
- A verse is added to the trail when you click a cross-reference, click a Strong's number in a verse, bookmark a verse, or navigate via the popup
- Click the Verse Trail button on the nav rail to reopen your trail at the last verse you visited
- Click any entry to jump back to that verse
- Remove individual entries with the × button, or use the Clear All button (the circle-slash icon in the verse action row) to wipe the entire trail. A confirmation dialog protects against accidental clears.
- Two persistence paths: When study mode is on, the verse trail is saved with your study. When study mode is off, the trail is saved to your account settings. Each path waits independently — switching between modes never loses your trail. (See Study Mode for details.)
- Without an account: the trail works fully during your visit — but nothing saves, so it's gone when you leave. Create a free account and it persists.
Community Portal
🔑 Free account required
The Community Portal lets you share your Bible studies with friends and groups. Access it from the Community button on the nav rail. (Without an account, the button invites you to create one — every free account includes full community access.)
The Feed & Posts
Your feed shows posts from the people you've connected with (your Disciples), the groups you belong to, and anything shared directly with you. Create a post — a thought, a verse, or a prayer — and send it to your feed, to a group, or privately to a single disciple.
Reactions & Comments
- React to any post — Amen, Love, or Fire. Click a different reaction to switch instantly.
- Comment on posts, reply to comments, and react to comments too. You can edit or delete your own.
Sharing & Adopting Studies
The heart of the Community Portal is sharing studies. Post a study to your timeline, a group, or specific disciples. The shared study carries everything it contains — verses, commentary, Library passages, introductions, ISBE articles, study notes, and tags.
- On any study that isn't yours, click Add to My Studies to adopt it — the entire study copies into your own library, ready for you to build on
- An adopted study is a real study of yours — on a free account it counts toward your 5 active studies
- Only Active studies can be shared; archived studies stay private
Groups & Disciples
- Groups — create a group, discover public groups, request to join, and (as an admin) approve requests, invite members, and post to the group feed
- Disciples — send and accept connection requests; disciples can share posts and studies privately with each other
- Notifications — you're alerted when someone reacts, comments, replies, shares a study, sends a request, or invites you to a group (with optional email alerts)
Account & Subscription
Your account keeps everything in sync and holds your subscription. Open My Account from the navigation rail.
Signing In
- Email & password, Continue with Google, or a passwordless one-time link sent to your email
- Forgot your password? Request a reset email and set a new one
- Your data is cloud-synced — sign in on any device and pick up exactly where you left off
The My Account Modal
- Basic Info — your name, email, phone, and billing address
- Subscription — your plan, status, and billing (see below)
- Support This Effort — make a one-time gift (see below)
- Churches & Missions — optionally tell us the churches and missions you'd like giving directed toward
- Contact — send the team a message
Free Accounts & Supporter Subscription
Reading is free for everyone — no account needed to explore the Bible texts, commentaries, the Theology Library, and the ISBE encyclopedia. A free account saves your work: bookmarks, tags, notes, highlights, word studies, and up to 5 active studies plus 5 archived. A Supporter subscription removes the study limits:
- Monthly — $7.99 CAD / month
- Annual — $79 CAD / year (best value)
Payment is handled securely by Moneris — your card details are entered directly with the processor and never touch our site. Applicable Canadian taxes are calculated at checkout, and U.S. billing is supported. Manage or cancel your plan any time from the Subscription tab; if you cancel, you keep access until the end of the period you've paid for.
Support This Effort — a One-Time Gift
Prefer to give once rather than subscribe? The Support This Effort tab in My Account takes a one-time gift of any amount from $5 CAD: pick a preset or type your own, then Continue to secure payment. The same Moneris checkout handles the card. No tax is added to a gift, and your giving history appears beneath the form.
A gift is not tax-deductible. You will receive a thank-you email as your record.
Settings
🔓 Open to everyone — with an account, settings save to the cloud and sync across devices; without one, theme and font work for the visit only.
Access settings from the gear icon on the nav rail or press Ctrl+S. With a free account, all settings are saved automatically to your cloud account and sync across devices.
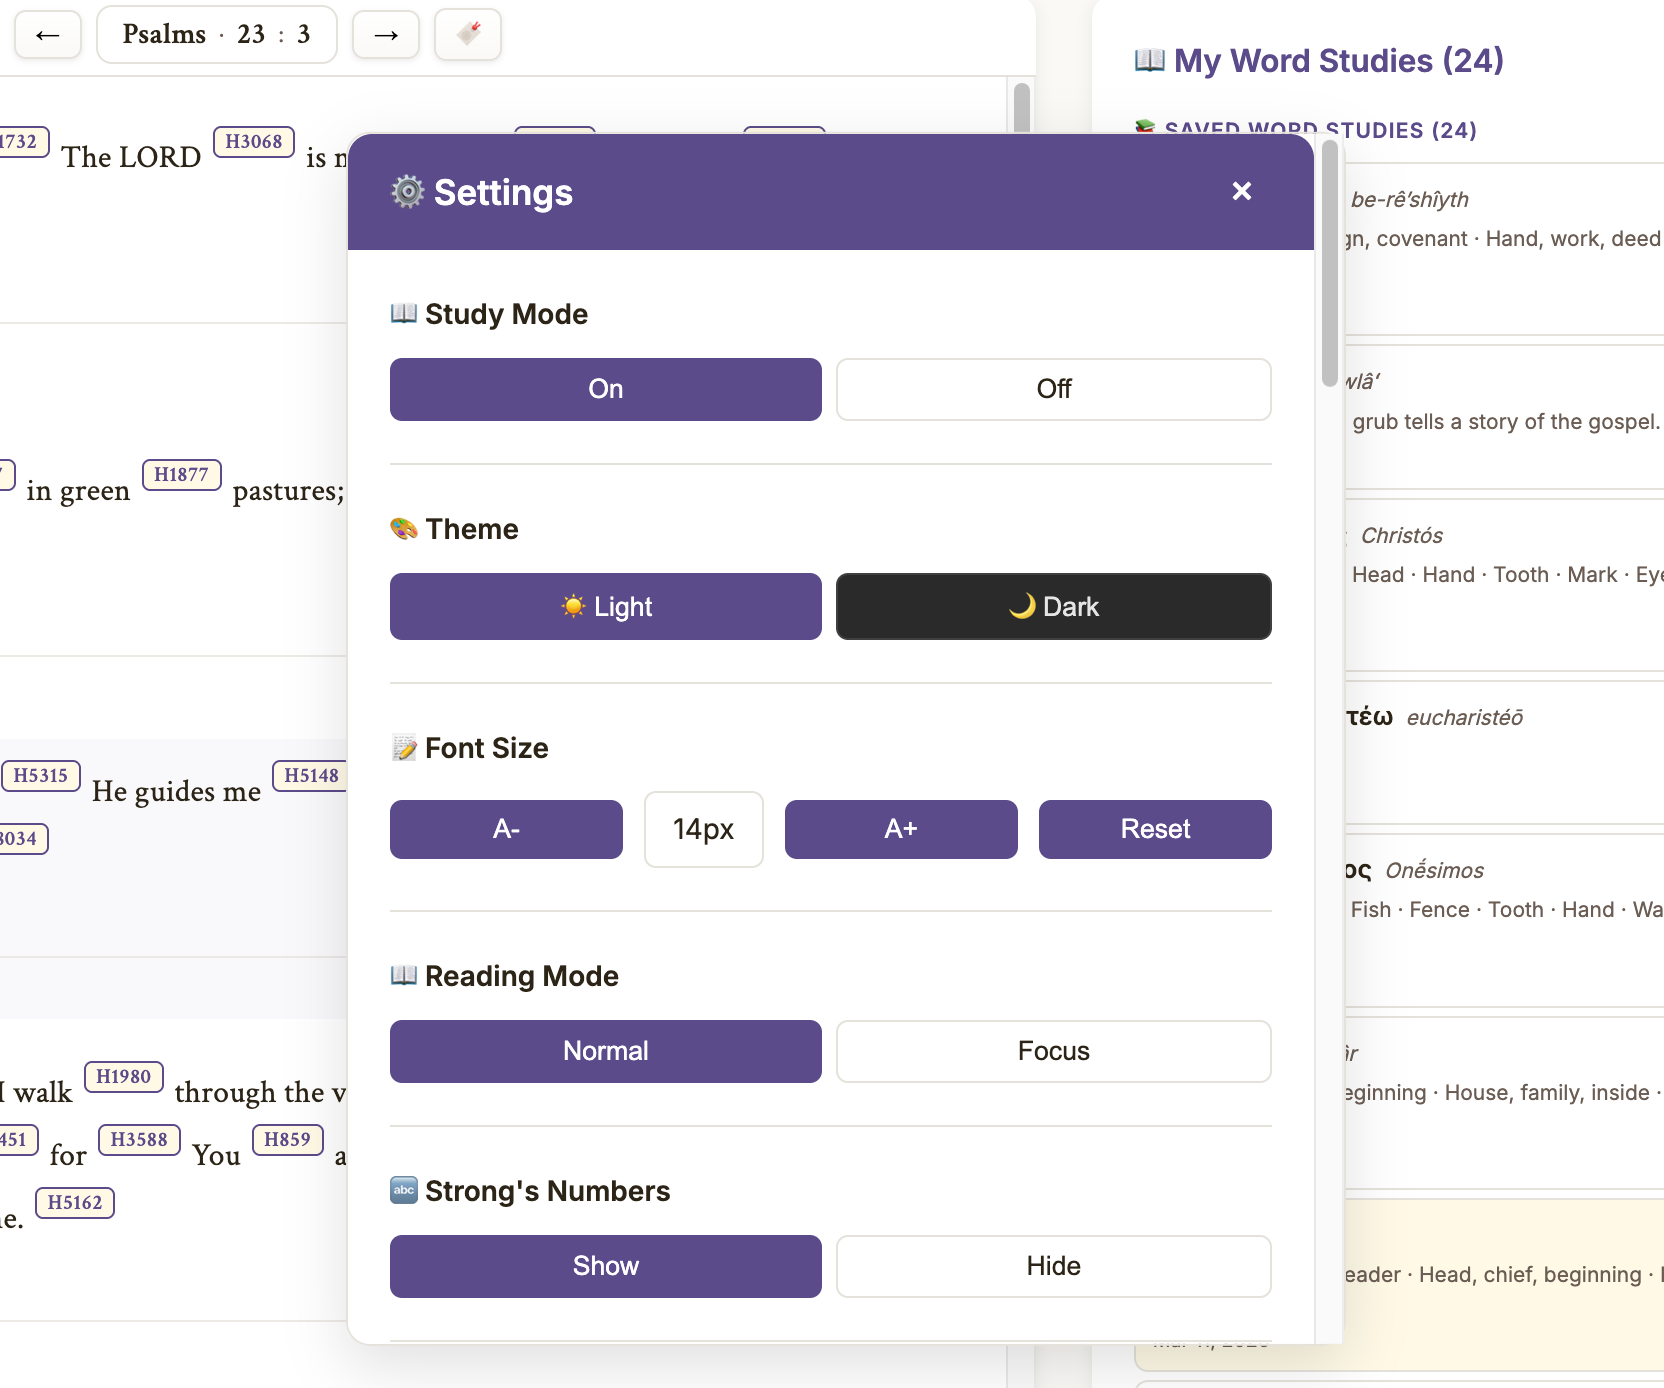
Study Mode
Toggle study features on or off. When off, you can simply read the Bible without study tracking cluttering your workspace. See Study Mode for full details on what changes.
Theme
Choose between Light and Dark mode. The dark theme is gentle on the eyes for late-night study.
Font Size
Adjust the base font size from 12px to 24px using A- / A+ buttons, or reset to the default (16px).
Reading Mode
- Normal — Full layout with sidebar, nav rail, and all verse interactions
- Focus — A distraction-reduced mode for concentrated reading
Strong's Numbers
Toggle Strong's number visibility on/off. When hidden, the verse text appears as clean English without any superscript codes.
Tag Picker Auto-Close
When enabled, the Tag Picker automatically closes after a set number of seconds (2, 3, 5, or 7). Turn it off if you prefer to close the picker manually.
Tag Visibility (Three Layers)
Each tag layer can be independently toggled:
- Bible Tags — Show/hide the solid permanent tag dots
- Study Tags — Show/hide the dashed study tag dots
- Word Tags — Show/hide the "W" word tag dots below verses
Manage Studies
Opens the Manage Studies workspace — a two-column view where you archive, restore, rename, and delete studies by dragging them between Active and Archived.
Navigation Bar
Reset Nav Order to Default restores the navigation rail to its original button order, in case you've dragged the buttons into a custom arrangement you'd like to undo.
Reset All Settings
Restores every setting on this panel to its defaults.
Data Sources & Credits
Scripture Toolkit is built entirely on public-domain and openly-licensed sources: 16 Bible texts (13 translations plus the original Hebrew, Greek, and Septuagint) with Strong's tagging, the Strong's Hebrew & Greek concordance, the Brown-Driver-Briggs Hebrew Lexicon, the Abbott-Smith Greek Lexicon, 16 commentary sources, the International Standard Bible Encyclopedia (1915), the classic Theology Library, and OpenBible.info cross-references. The Sources & Credits button in Settings lists every translation, commentary, lexicon, and Library work with its full attribution.
Study Mode
🔑 Free account required — the toggle is part of your saved settings
Sometimes you just want to read the Bible without all the study tools around you. Study Mode is a simple on/off toggle that lets you switch between full study tracking and a quieter reading experience.
What Changes When Study Mode Is Off
- Four nav buttons are hidden: Study, Save, Dictionary, and Bookmarks disappear from the navigation rail, giving you a cleaner workspace
- Strong's numbers still work — clicking a Strong's number still shows the definition in the sidebar. The difference is that it won't track the word in your study dictionary or mark anything as needing saving
- Tags still work — you can still tag verses with Bible-level (permanent) tags. The tag picker shows a "Bible" label to remind you these are permanent tags, not study-scoped ones. Study tags are hidden from the Tags sidebar
- Notes, search, highlights, cross-references, and the verse trail all continue to work normally
- Verse trail persists to your account settings when study mode is off, instead of to a study. It's waiting for you whenever you come back
How to Toggle Study Mode
There are two ways to turn study mode on or off:
- Settings panel — The Study Mode toggle is the very first setting. Click On or Off.
- Study Console header — An orange "Study Mode" button sits in the Study Console header bar. Click it to turn study mode off. (You won't use this to turn it back on — you'll be in the Study Console because study mode is already on.)
Unsaved Changes
If you have unsaved work in your current study and try to turn study mode off, you'll see a prompt asking if you'd like to save first. Click OK to save and then turn off study mode, or Cancel to stay in study mode with your work intact. No data is ever lost.
Bookmarking With Study Mode Off
Collected verses are part of a study, so sending a verse when study mode is off will prompt you to name and start a new study. Once you give it a name, study mode turns on, the study is created, and the verse is added — everything flows naturally from there. This works the same way from all three entry points: the tray button on a verse card, the tray button in the verse trail popup, and Send All in the Bible reader header.
If you cancel the prompt, nothing happens — no study is created, no bookmark is added, and study mode stays off.
Switching Back and Forth
Your study and your reading trail are kept in separate buckets. When you turn study mode off, your study stays exactly where you left it. When you turn it back on, your study picks up right where it was. The verse trail you built while reading without a study is saved to your account and waits for the next time you turn study mode off again. Neither one interferes with the other.
Keyboard Shortcuts
Scripture Toolkit supports keyboard shortcuts for power users. All shortcuts use Ctrl on Windows/Linux or Cmd on Mac. Shortcuts that open saving tools (Bookmarks, Notes, Dictionary, Study Console) invite you to create a free account when you're not signed in; Search and Settings work for everyone.
| Shortcut | Action |
|---|---|
| Ctrl+B | Toggle Bookmarks sidebar |
| Ctrl+N | Toggle Notes sidebar |
| Ctrl+L | Toggle My Dictionary sidebar |
| Ctrl+F | Toggle Search sidebar |
| Ctrl+S | Toggle Settings panel |
| Ctrl+Shift+S | Open Study Console |
| Ctrl+Shift+L | Toggle Lexicon Study Center |
| Left Arrow | Previous chapter |
| Right Arrow | Next chapter |
| Escape | Close popups and modals |